SEAT WEAVING
THE MANUAL ARTS PRESS
PEORIA, ILLINOIS
1917
The Project Gutenberg EBook of Seat Weaving, by L. Day Perry

This eBook is for the use of anyone anywhere in the United States and most
other parts of the world at no cost and with almost no restrictions
whatsoever.  You may copy it, give it away or re-use it under the terms of
the Project Gutenberg License included with this eBook or online at
www.gutenberg.org.  If you are not located in the United States, you'll have
to check the laws of the country where you are located before using this ebook.

Title: Seat Weaving

Author: L. Day Perry

Release Date: October 15, 2016 [EBook #53288]

Language: English

Character set encoding: ISO-8859-1

*** START OF THIS PROJECT GUTENBERG EBOOK SEAT WEAVING ***


Produced by Chris Curnow, Sam W. and the Online Distributed
Proofreading Team at http://www.pgdp.net (This file was
produced from images generously made available by The
Internet Archive)
Transcriber’s Note
The cover image was created by the transcriber for the convenience of the reader, and it is placed in the public domain.
THE MANUAL ARTS PRESS
PEORIA, ILLINOIS
1917
Copyright, 1917, by
L. Day Perry
Woodworking shops in manual training schools far outnumber those for other manual activities, and as a result, courses in woodwork have come to be termed the stable courses in a handwork curriculum. However, experience in woodwork alone is not sufficient, and needs to be supplemented by other and more varied activities to give to the boy a proper foundation for choice of vocation.
A definite way to produce necessary variety as applied to woodwork, especially if woodwork is the only course offered, is thru the use of such mediums as cane, reed, rush, splints and allied materials in correlation with the wood. These materials add life to the problems and generally arouse interest and enthusiasm in the work at hand. The result is careful application to construction details, with resultant appreciation of constructive design.
It would prove a difficult task to make a fair estimate of the value such mediums have in manual training shops. Their use produces very definite reactions upon boys who could not be reached by woodwork alone, awakening them to a new interest in their work and making them more workmanlike and exacting in construction.
There exists some element in such mediums which cannot be defined, but which nevertheless stimulates the average or mediocre boy, as well as the exceptional one, to produce the best work of which he is capable. Experience with these materials utilized in correlation with wood will prove the truth of these statements and demonstrate that they are not only worth while, but necessary to any well-rounded course in wood.
The originals of the projects illustrated by the photographs were, with few exceptions, constructed by boys of average ability in the eighth grade. They indicate the character of work which may be [Pg 4] expected of boys in that grade, and, in a measure, the first two years of high school.
Practically the entire emphasis is laid upon weaving as applied to some form of seat, either as a decorative feature or as a necessary part of the structure. These materials may be utilized in various ways on varied types and forms of furniture other than seats, a few of which are suggested. Experience with them will lead the worker to new and interesting fields of a distinctly educational nature.
Joliet, Illinois, November, 1916.
L. DAY PERRY.
Acknowledgments are hereby made to The Bruce Publishing Co., for permission to re-use the material in Chapters I and II which appeared in The Industrial Arts Magazine in a modified form; to The Periodical Publishing Co., for the photograph shown in the frontispiece; to M. F. Gleason, Joliet, for the sketches shown in Figs. 5, 6 and 8; to T. S. Moore, Joliet, for his cooperation in all the photographic work; and to the instructors in the Joliet Department of Manual Training who have assisted in working out a number of the problems.
L. D. P.
| PAGE | |
| Foreword | 3, 4 |
| Acknowledgments | 4 |
| Chapter I.—Caning; The Seven Steps | 7 |
| Cane | 7, 8 |
| Equipment | 8, 9 |
| Beginning the Operation | 9, 10 |
| The Seven Steps in Caning | 10-14 |
| Chapter II.—Caning Suggestions | 15 |
| Irregular Areas | 17-21 |
| Five-Step Caning | 21, 22 |
| The Design Element | 22-25 |
| Chapter III.—Reseating a Chair; Hand Caning | 26 |
| The Process | 27-31 |
| Refinishing | 31-33 |
| Chapter IV.—Reseating a Chair; Cane Webbing | 34 |
| The Process | 35-40 |
| Chapter V.—Rush Seating | 41 |
| Historical | 41-42 |
| Rush | 42-43 |
| Other Materials | 43-44 |
| Preparation of Materials | 44-46 |
| The Weaving Process | 46-49 |
| Rectangular Seats | 49-50 |
| Irregular Seats | 50-51 |
| Suggestions | 51-54 |
| Finish | 54 |
| Chapter VI.—Reed and Splint Weaving | 55 |
| Primitive Methods | 56-57 |
| Bleaching | 57-58 |
| Staining | 58-59 |
| Other Materials | 59-62 |
| Chapter VII.—Seats of Reeds and Splints | 63 |
| Indian Splints | 72-79 |
| A Rustic Chair | 79-80 |
| A Woven Table | 81 |
| Willows | 81-82 |
| Weaving Materials: Where to Obtain | 84 |
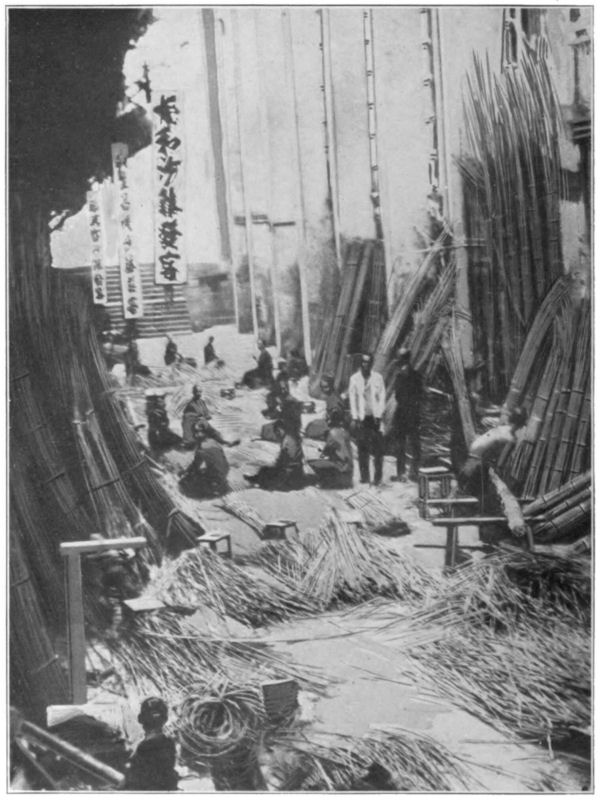
Courtesy, Periodical Publishing Co.
A TYPICAL ALLEY SCENE IN HONG KONG SHOWING NATIVE MEN AND WOMEN SORTING AND STRIPPING RATTAN.
That caning has not been undertaken to any appreciable extent in school shops is due to the fact that instructors are unfamiliar with the weaving processes. Caning is not difficult. It, in common with many other lines of activity, is best learned thru observation. However, it may be undertaken by the average person after careful study of printed directions and illustrations. If the worker will closely observe his own work as it progresses, and follows instructions carefully, he should have no unusual difficulty in caning an area very acceptably in the initial attempt. Particular attention should be paid to directions which tell of errors to avoid. Errors creep in, in a very unobtrusive manner at times, and the amateur will find them hard to detect.
Cane.—Cane is the name applied to a great number of plants which possess long, slender, reedlike stems. The name should apply only to a class of palms called rattans. These plants are found thruout the Indian Archipelago, China, India, Ceylon, and the Malay Peninsula. They grow in dense, dark forests and form a matted undergrowth which makes passage difficult or impossible. These palms are trailing in tendency, yet frequently grow to tree height. They then fall over and lie on the ground. The stem is covered with beautiful green foliage, grows to a length of 100 to 300 ft., and rarely exceeds 1 in. in diameter. The stems are cut into lengths of 10 to 20 ft. for export. The outer bark is stripped into widths varying from ¹⁄16 to ³⁄16 in. These strips are put into hanks of 1,000 lineal feet each. The cane is then ready for the cane weaver. A hank of cane costs from 60 cents to $1. The width of the cane and its quality determines the price per hank. It may be purchased from any upholstery supply house.
[Pg 8] Cane is named from the narrowest to the widest in order: carriage, superfine, fine-fine, fine, medium, common, narrow binder, and wide binder. Cane from India has a very glossy surface, while that from other localities is duller. The right side of the cane is easily determined by this glossiness.
Cane for weaving purposes should not be confused with the popularly called cane or bamboo of our southern states, where it forms the well known cane-brakes. This cane rarely exceeds a height of 20 ft. It grows rapidly and very straight, and to an appreciable diameter. Such cane is used for bamboo furniture, walking sticks, poles, etc. The ordinary domestic sugar cane, also, should not be confused with seating cane.
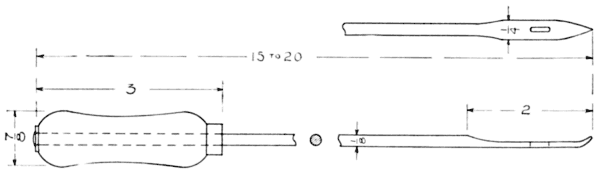
Equipment.—The tools needed in cane weaving are few in number. A special one is called the caning needle. This may be made in the school shop. Fig. 1 shows a working drawing of the needle. Its length is variable, depending upon the work at hand. It is desirable to have a number of different lengths. The tool is made of good flexible steel wire. This is flattened at one end, an eye cut in it, blunt pointed, and slightly curved as indicated. The other end is inserted in an ordinary small tool handle, extended thru and riveted. The riveting prevents the wire from drawing out of the handle under a pulling strain.
The other tools needed are a scratch awl, and a pair of scissors or knife. A button-hook with the hook straightened or cut off [Pg 9] may take the place of the awl. A pair of dividers and rule are necessary for marking. Several wood pegs are needed. These may be classed with the tools. They are made from a ¼ in. dowel rod, or the equivalent. Cut them about 4 in. long and point them as you would a lead pencil. The amateur is inclined to use a number of pegs. Four should prove amply sufficient.
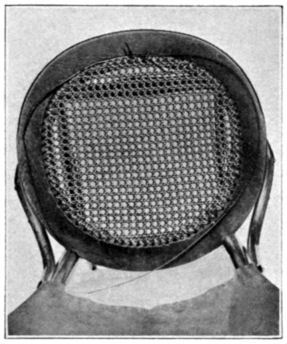
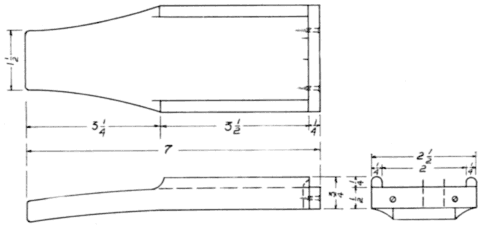
Beginning the Operation.—Fig. 2 is a photograph of an upholstered leg rest with caned sides. This rest will be used for our initial work in cane weaving, inasmuch as the area for caning is rectangular. It is not advisable for the beginner to have his initial experience on a chair seat, for the area is usually of an odd shape, and arms, legs, and back interfere. However, any rectangular area on which there are no projections to bother may be used for the first trial.
It is assumed that the sides of the rest have been fitted. The rails and stiles are then assembled with glue, without the posts. When the glue has set the proper length of time, and the frame is cleaned and sanded, the rails and stiles are ready to dimension.
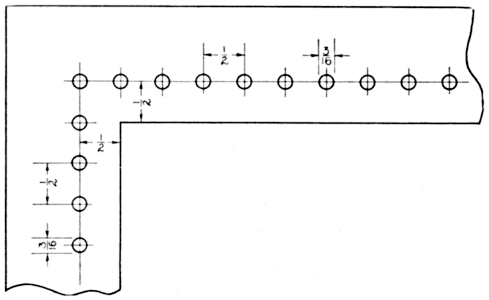
Draw pencil lines entirely around the inner sides of the rails and stiles, ½ in. from the edges. This distance remains constant, usually, on all areas and with canes the various widths. With a pair of dividers set at ¼ in. space off points on the pencil lines, starting from the intersection of the extended lines on each rail. Fig. 3 is a working drawing of a corner, dimensioned as suggested. It will make clearer the directions. It is fundamental that the spacing be done in the same direction on parallel rails, for at times [Pg 10] the last space will be a short ½ in. or whatever dimension is used. In such cases it is necessary to redivide the last several spaces into divisions as near ½ in. as possible. It thus becomes obvious why spacing must be done in one direction as stated. This applies to all rectangular frames.
With a ³⁄16 in. wood bit bore holes thru the rails and stiles at the points marked. Countersink the holes slightly on the underside of the frame. This is not absolutely necessary but aids considerably in locating the holes, and in other ways. In shops where power machinery is available a vertical borer may be used for this purpose. It is best to carefully mark the points for boring with a center punch. The twist bit will then start accurately and the danger for getting out of line will be reduced to a minimum. The dimensions given here are for fine-fine cane. Use sandpaper to remove pencil lines and rough edges left from boring; then clamp the frame over the edge of a table or bench with a carriage clamp; sit while doing the weaving.
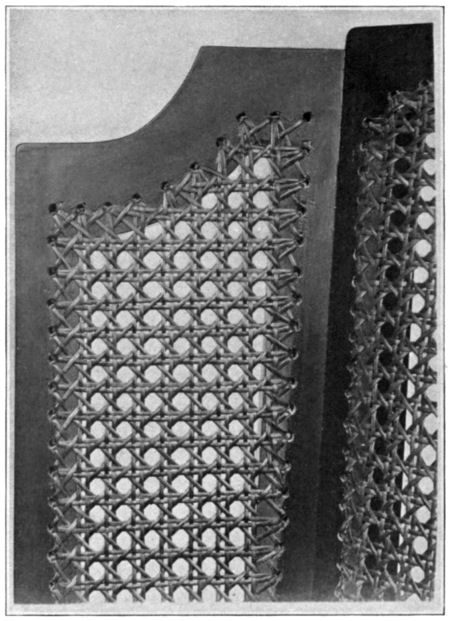
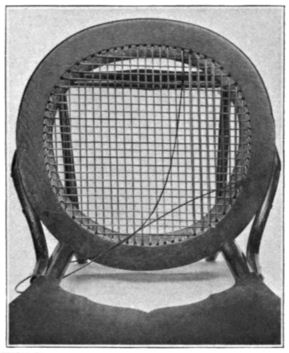
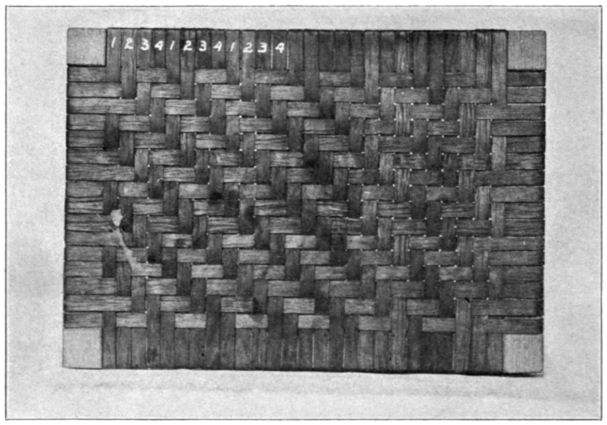
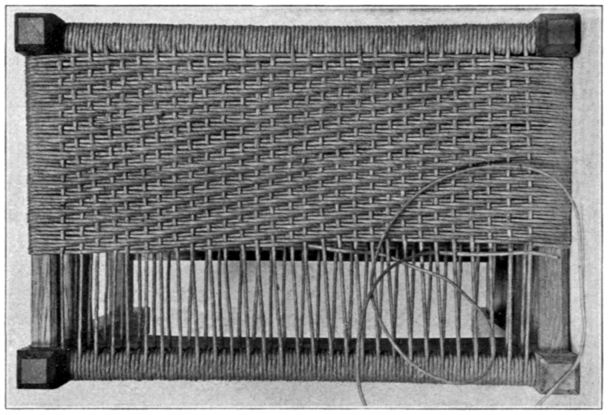
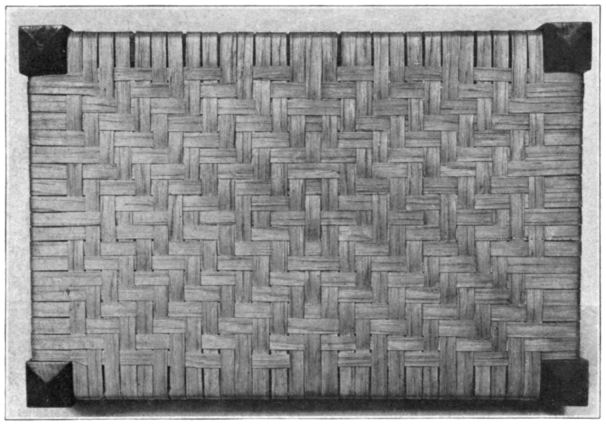
The Seven Steps in Caning.—Fig. 4 shows the seven steps in caning. Refer to this photograph thruout the following directions. The numbers on the photograph refer to the steps.
Step 1. A hank of cane should be soaked for a few minutes in warm water, or longer in cold. Do not soak it too long. Start a strand by drawing one end thru a hole next to a corner hole, and let it project about 3 in. below. Fasten with a peg. Then starting [Pg 11] at the peg, pull the entire strand thru the thumb and forefinger to prevent twisting, and pull the end down thru the hole on the opposite parallel rail next to the corner hole, and then up thru the hole next to it. See that the right side of the cane is out on the underside of the frame as on the top. Pull the cane reasonably taut, and fasten with a peg to prevent the strand from slipping back and becoming loose. Draw the cane thru the thumb and forefinger again; pull it across the frame and down thru the hole next to the peg and up thru the hole next to it. Pull taut and fasten with the [Pg 12] second peg. This operation is repeated until all holes have been utilized on the two parallel rails, except those on the corners. Thruout the seven operations it is necessary that the cane be kept from twisting by drawing the remaining part of the strand thro thumb and forefinger.
Step 2. The second step is identical with the first, with the difference that the other two parallel rails are used, and that the canes run over the first set of parallel canes. If the first strand of cane has not been entirely used up in the first step, the remainder is used to begin the second step.
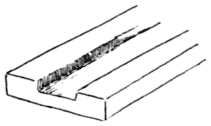
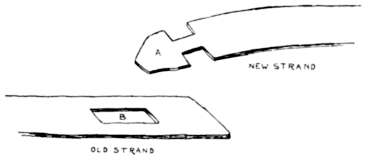
Step 3. This step is a repetition of the first two. The canes of this series run over the first and second series and parallel with the first. As each strand is used up bind the end by pulling it under a cane, crossing from one hole to another underneath the frame and cutting off about ¼ in. from the cane. Fig. 5 shows how this binding is done. The loose end at the starting point is tied in this way, and all subsequent ones should be tied as they come, thus avoiding interference by many pegs, and insuring neat binding.
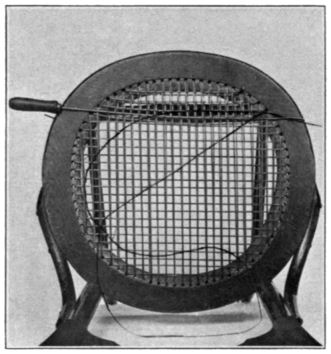
Step 4. The actual weaving begins with this step. It may be done entirely by hand, without resort to the needle, but it is slow work. The needle should be used. Start at a hole next to a corner on either rail that has been used but once, working from caned side toward the open frame. Go over and under the strands necessary to form the weave, turning the needle from side to side in order to catch the canes behind the point. When across thread the needle with the strand and pull thru, being careful to avoid a twist. Pull the end down thru the hole, pairing the canes. Pull the cane up thru the next hole; then start the needle from the opposite side of the frame and repeat the first operation, thus pairing another set of canes. Continue until all canes are paired and all holes used. Soak the woven cane with a wet sponge, and with two pegs straighten the strands of cane and force all pairs together. Small, [Pg 13] open squares are thus formed over the area being caned. Unless the cane is soaked it will prove rather difficult to pair the canes.
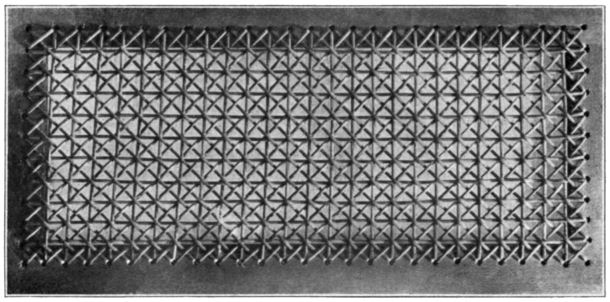
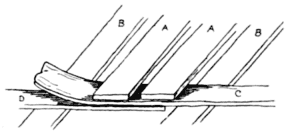
Step 5. This step is the weaving of one set of diagonals. Start the strand at any corner hole. Use one hand over and one under the frame. As the worker becomes skilful he will find it easier to give the cane a slight curve and work with both hands on the upper surface. Use an end of cane long enough for convenient handling; then pull the entire strand thru the length of the frame, provided the area is not too great. Care must be taken to avoid twisting the cane. The cane will run easily, and partially under a cane at the corners of the squares, if correctly done. Fig. 6 shows this clearly, as does the illustration in Fig. 27. The second illustration is a photograph of a strip of cane webbing, is approximately half size, and will supplement the freehand sketch. The corners will bind, and the strand will pull with difficulty if the cane is incorrectly woven. On parallel canes note that the canes either run over or under the pairs.
Step 6. This step is identical with the preceding one. The canes are at right angles to the first diagonals. In this step and the preceding one note that two strands run into the corner holes. This holds true in all rectangular frames where a corner hole is bored. It permits the strands to run in as straight a line as possible. If it is necessary to turn abruptly to enter a hole it is obvious that an error has been made by the weaver.
Step 7. Pull a cane of the same size as used in the other steps up thru a hole, over the binder cane and down thru the same hole. A loop is thus formed and the binder secured. Pull taut, then [Pg 14] enter the next hole, pull up the cane over the binder and down, and so on. This operation may be repeated at every other hole when the holes are close together. The two ends of the binder are finally overlapped and secured, and the operation thus completed. At times, when the last strands are woven, it may prove advisable to secure canes underneath the frame by plugging the necessary holes; at least in instances where the canes have a tendency to work loose.
SUGGESTIVE PROJECTS.
As weaving progresses difficulty will be experienced in inserting cane ends in the holes, due to their becoming filled. Force the scratch awl thru and turn it several times. This will effectively force an opening.
In many instances long ends of cane remain from one series to another. These generally, as previously mentioned, should be used in succeeding steps. There is one limitation. They should be used provided it is not necessary to carry them over more than four holes on the under side of the frame. The fewer loose ends left, the better, for the caning is thereby neater and better. It is generally advisable to use a full length strand to avoid a number of loose ends.
The amateur will find his greatest difficulty in properly weaving the diagonals at the edges; that is, immediately upon entering or leaving a hole. Many commendable pieces of caning are spoiled by ragged, improperly woven edges. Care must be taken to see that the cane goes over and under the proper strand or strands at these points. Fig. 6 clearly shows how the diagonals should run. Study it carefully.
The addition of a binder is generally a matter of taste. Perhaps 50 per cent of modern hand caned furniture does not employ a binder of any description. The series of regularly exposed holes are rather pleasing and in no way detract. However, in chair seats a binder is essential to protect the ends of canes, for they are subject to hard wear.
Binders of reed or of wood called “splines” may be used on hand-caned frames. If either is used a groove ¼ in. deep and ³⁄16 in. [Pg 16] wide is cut coincident with the holes before weaving is begun. After the area is caned the strips are fitted and glued in. Use little glue. Tap the splines firmly with a mallet used over a block of wood, until they are flush with the woven cane. Chapter IV gives the method in detail.
The size of the holes and the distance between them is determined largely by the size of the cane used. Some prefer coarse meshed areas, while others desire them closely woven. There is, however, what we may term a standard mesh. The individual may vary the dimensions given to suit himself. The Jacobean or early caning was invariably of coarse mesh.
Carriage and superfine cane require ⅛ in. holes and ⅜ in. spaces; fine-fine cane requires ³⁄16 in. holes and ½ in. spaces; fine cane requires ³⁄16 in. holes and ⅝ in. spaces; medium, ¼ in. holes and ¾ in. spaces. Fine-fine and fine cane are the best sizes for shop use. A small amount of medium binder is desirable.
One hank of cane will ordinarily be sufficient for a half-dozen areas of approximately 12 in. by 12 in.
Most old pieces of period furniture utilizing cane employ a particularly narrow split horizontally and vertically, and a wider split diagonally. The opposite practice may be employed—a finer split of cane being used diagonally than horizontally and vertically. Both effects are pleasing.
In all illustrations of rectangular areas shown herein, corner [Pg 17] holes are bored and utilized in the cane weaving. These are not absolutely necessary; in fact caned areas on many pieces of period and modern furniture do not utilize corner holes. In such instances two diagonal strands are run in each hole on either side of the corner. A comparison of the areas, the one employing a corner hole, and the other not, will lead the observer to conclude that the former appears complete while the latter appears unfinished.
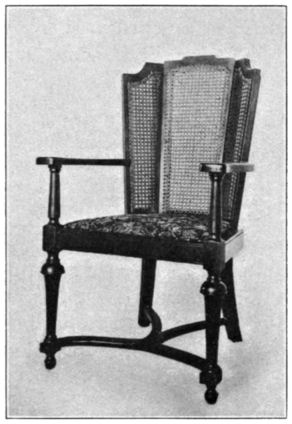
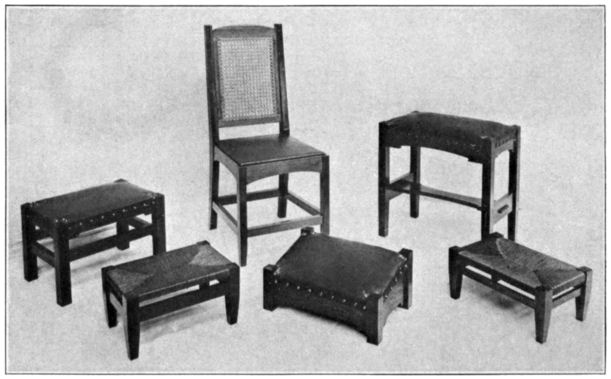
It is frequently necessary or desirable to cover up the cane on the back or inside of an article. This is true of places exposed to view, and is especially advisable on such pieces of furniture as the wingback chair shown in Fig. 7. This chair of William and Mary design was made in a school shop, is hand caned, and of mahogany. The exposed cane is covered with strips of mahogany ¼ in. thick and 1 in. wide in which a groove ⅛ in. deep and ⅜ in. wide has been run. This groove may be made with saw, chisel, or combination plane. Fig. 8 shows a sketch of such a strip. It makes a neat, pleasing cover. Many pieces of so-called expensive furniture have ragged, exposed caning. This is unsightly and is not to be commended.
Wherever it is found desirable to leave cane natural, it is necessary that the frame be stained before caning is begun. Box fuming will not permanently color cane. Oil stains make no appreciable impression if rubbed off at once. But water, acid, and alcohol stains produce decided colors. If the worker desires to color the cane approximately the same shade as the article, the caning may be done on the white wood and the entire article stained at the one operation. Cane may be shellacked or varnished or left natural, as desired.
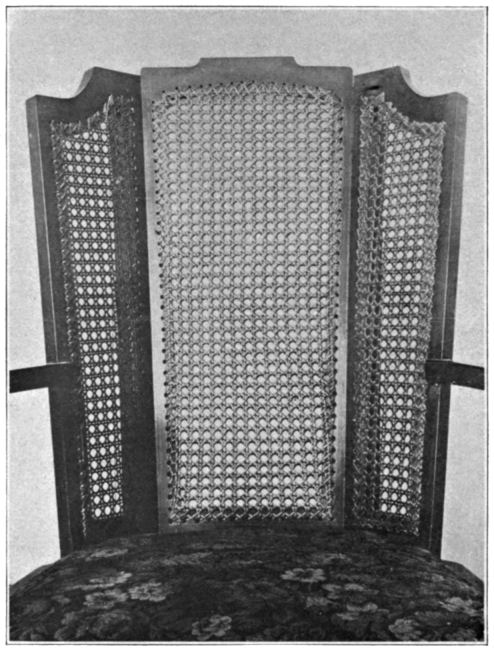
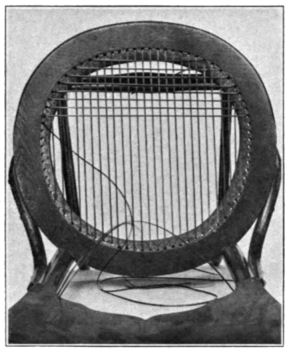
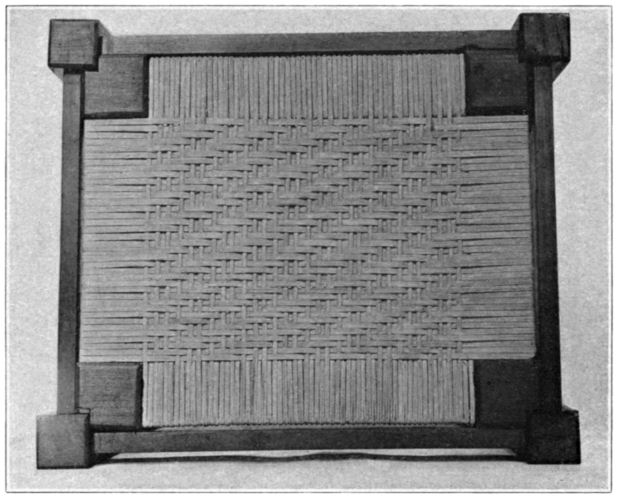
Irregular Areas.—Fig. 9 shows a close view of the back of the chair illustrated in Fig. 7. This is a typical example of an irregular-shaped area for caning. The principles of weaving remain the [Pg 18] same in areas of any shape, yet each requires slightly different treatment. Each has its individual problem. It is necessary to skip some holes altogether. This is never done in rectangular shapes. A close inspection of the photograph will reveal many skipped holes. This is necessary to keep parallel strands equidistant, and diagonals straight.
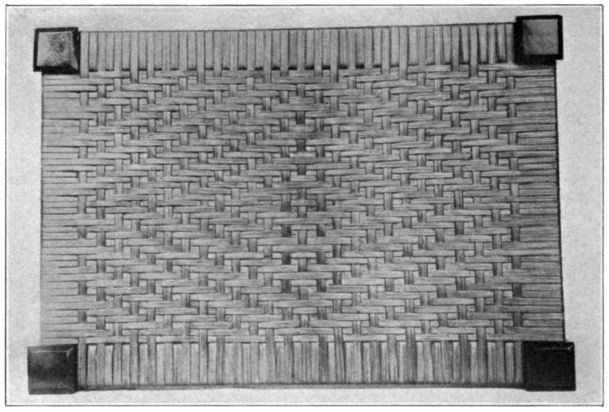
To clearly understand how the holes are located on a wing of [Pg 19] this chair refer to Fig. 10. The left upright and lower rails are at right angles to each other. The upper rail is curved and the right upright slanted. Measurements are begun at the lower left hand corner and proper distances spaced on the left upright. With the arm of a try-square against this upright, points are marked on [Pg 20] the opposite upright in line with those on the former. This operation is repeated on the lower rail and the upper curved one. Strands of cane will then obviously run parallel. Inasmuch as there are five holes in the base and eight in the top it is necessary that three vertical strands be run into the slanting upright in any holes which will permit the strands to run parallel to each other. The photograph of the caned wing, shown in Fig. 11, should make very clear the foregoing explanation. Experience with several unusual shapes [Pg 21] is necessary before the weaver feels confident of readily caning any area of odd shape.
In weaving the diagonals it is frequently necessary to run several in one hole in order to keep the canes as straight as possible. Just when this should be done can only be determined by the worker. A diagonal should never be permitted to swing to any great degree out of a straight line. A close observation of the photograph of the wing will reveal many diagonal canes in one hole, and several holes skipped entirely.
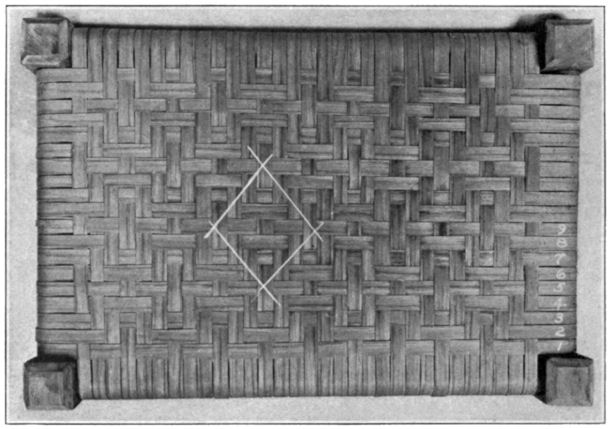
Five-Step Caning.—Cane weaving of five steps is not common. It may be done in many cases where it will not be subject to hard wear. It is neat in appearance and is much simpler than seven-step caning. The presumption should not be made that this weave will in any way supplant the regular weave, but in instances where decoration is the object, and not service particularly, this weave will prove sufficient and effective.
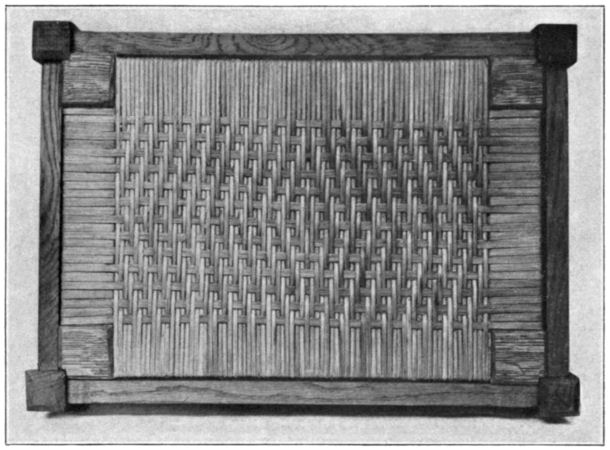
Fig. 12 illustrates a frame caned with the five steps. The distance between holes was purposely made greater than usual, to show the weave clearly. The first strands are strung in, in the same manner as described in the seven steps. The second series of [Pg 22] strands are interwoven with the first. The over and under weave is used. Each alternate row of each series is either over or under. The first diagonal strands run over the preceding two series. They are not woven as in seven-step caning. The second diagonal strands run over the first diagonals and under the intersection of the other strands, including every alternate first diagonal. This resolves itself into simple over and under weaving. Note that but one strand of a diagonal enters a corner hole. This is not true of seven-step caning, as elsewhere indicated. It is advisable to utilize a wider cane in the first two steps, than is used in the subsequent ones.
The Design Element.—Caning is not a fad. Cane was commonly used in Carolean furniture in England about 1660, and has continued in use for seating purposes thru the various subsequent periods. The application of cane as used today on French furniture, as in panels, is historically wrong. However there can be no valid objection to its use in panels if no attempt is made to name it a true period style. Also it must be conceded that period furniture was not always well designed, and there can be no well sustained objection to the use of cane in panels, provided it is in keeping structurally and decoratively with the particular piece of furniture.
[Pg 23] The introduction of cane at first was undoubtedly brought about by a desire for something light, substantial and serviceable, and it blended well with the oak of the period. Cane is much used on modern furniture, and without doubt it adds to the beauty of the given pieces. In many cases the decoration is overdone and instead of improving the article the cane in reality detracts. Properly used, it enriches by breaking up flat uninteresting areas, and lightening the appearance of otherwise massive, cumbersome articles.
Under proper correlation with wood in school shops it promotes an appreciation of constructive design in which the element of beauty is a prime consideration. It is a practical medium in which the aspect of design as an element of utility is paramount. It has distinct commercial value, for the boys who have had training in the shops may do chair seating outside and earn considerable money. By such work they come to see a distinct relation between the commercial field and their shop experiences. This is a point of view which is very desirable in present-day industrial education.
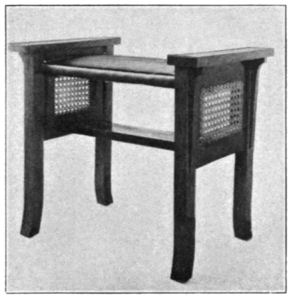
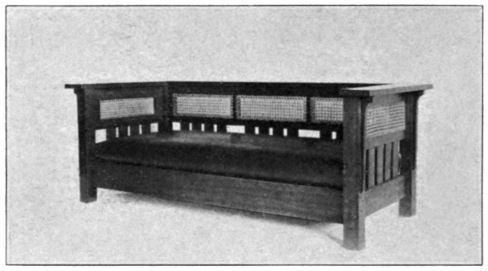
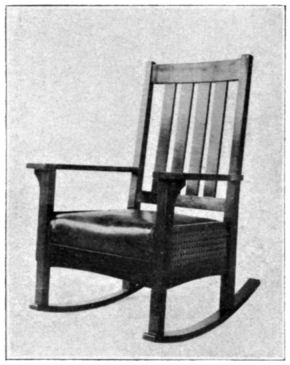
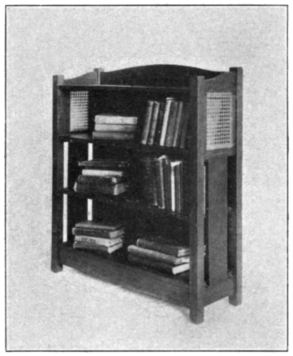
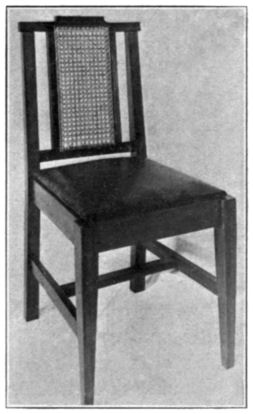
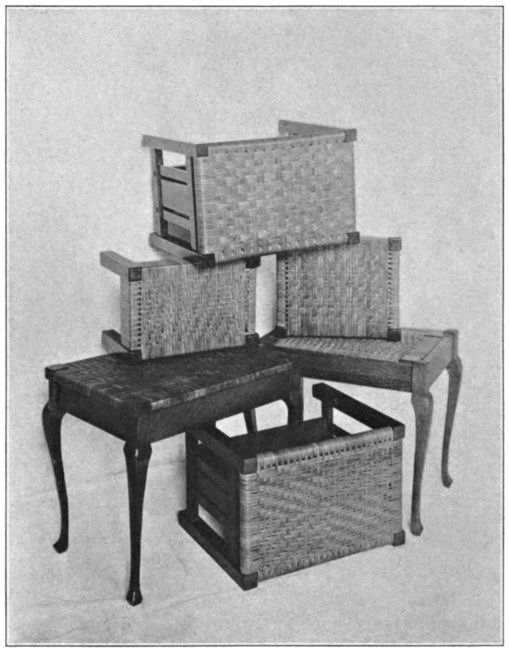
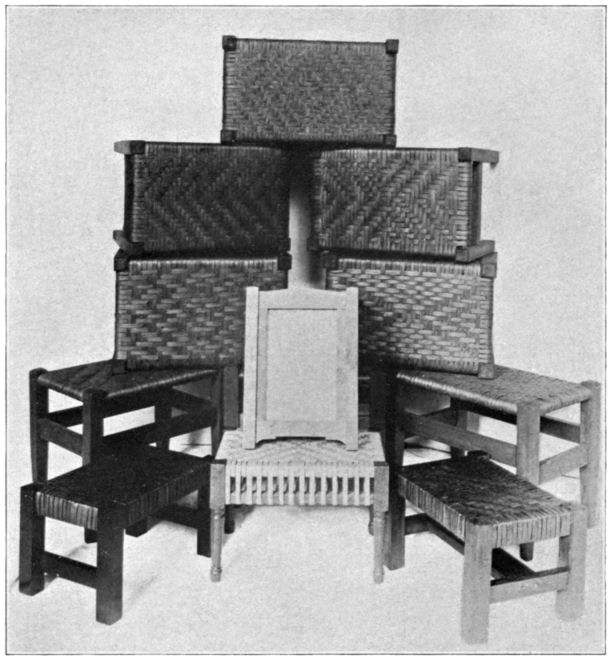
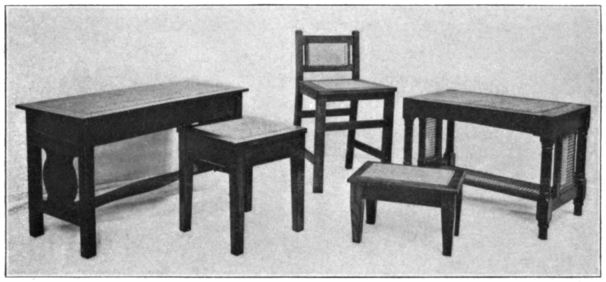
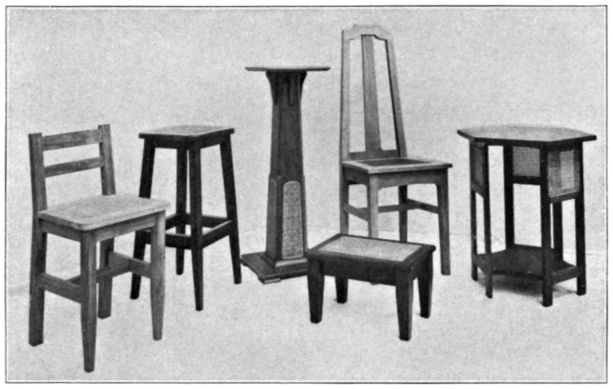
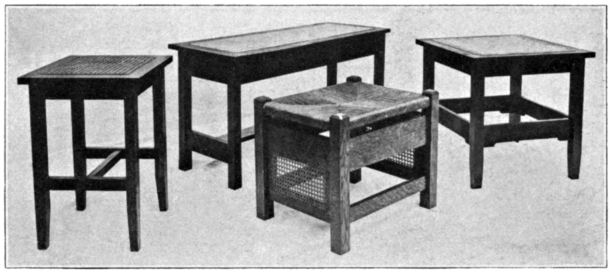
[Pg 24] Figs. 13, 14, 15, and 17 show pieces of furniture made in manual training shops by eighth grade boys. These pieces comprise a group, with the addition of the leg rest shown in Fig. 2 for a library or living room. The cane in each instance adds materially to the artistic effect of the problems; they have tone. The cane forms pleasing groups well related to the wood mass. The cane is natural, the wood fumed and finished flat. The two tones of color are in perfect harmony.
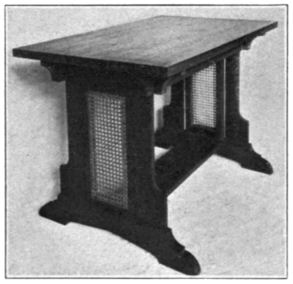
Fig. 16 shows a library table of oak constructed by an eighth grade boy. The lines are very pleasing and the long vertical caned panel adds a distinct note to the structure even tho purely decorative.
Many modifications of the standard weave in caning are in vogue, but are more or less fads. A “rotary” weave is rather prevalent on certain types of furniture, as is what may be termed the “spider-web” weave. These are mentioned merely to suggest that caning is subject to variation. However, the standard weave, of seven steps, will not be supplanted to any appreciable degree, for it adapts itself to almost all types of furniture both decoratively and structurally.
[Pg 25] It must not be presumed that the method described in Chapter I is the only one which may be employed in weaving this standard weave. There are several methods of weaving which arrive at the same ultimate result, but the one described is the simplest, and the most direct, and withal the one best adapted to general use, particularly to school-shop pupils.
SUGGESTIVE PROJECTS.
In many localities it is impossible to find a professional to reseat caned chairs either by hand or with cane webbing. Many chairs in good repair and worthy are relegated to the attic because of broken or sunken seats. Upholsterers generally will not be troubled with such jobs of caning for the work does not pay unless there is an amount sufficient to keep them steadily employed. Usually they are not adept enough to do such odd jobs as may come to them, even tho willing to do the work, within a time consistent with sufficient money returns.
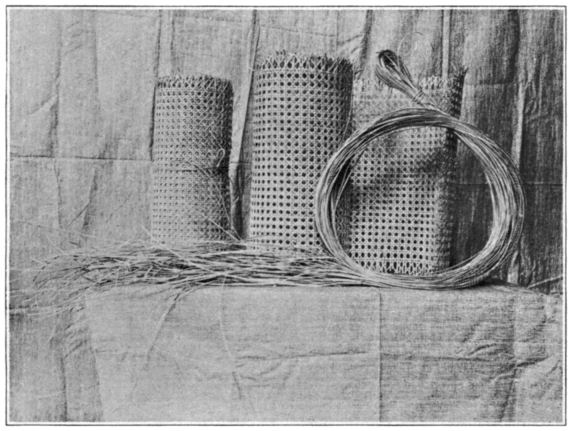
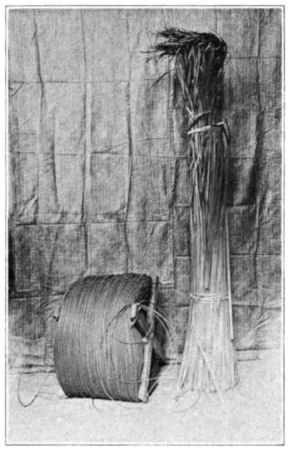
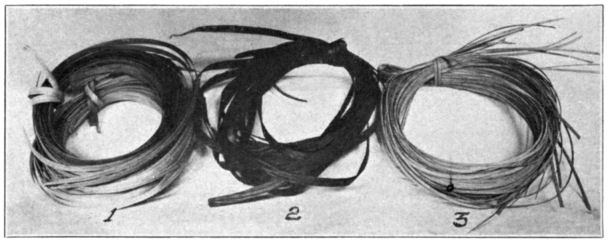
Chairs of ordinary size may be caned for a minimum of $1 and a maximum of $2. If the holes have previously been bored, much labor is thus avoided, and the charge is naturally made less. The professional cane weaver has various ways by which he determines the cost for recaning a given seat. Perhaps the most common method employed is that of charging so much per hole. This is from 1 to 2 cents. The difficulty in handling very fine cane is also a factor in deciding what to charge. Usually a casual looking over of the chair by the expert is all that is necessary to fix a price. No charge of less than $1 on a hand caned seat will sufficiently remunerate the worker. Fig. 18 shows a hank of cane and rolls of machine woven cane.
Any boy who has had instruction and sufficient experience in caning in the manual training shop may readily undertake jobs of caning. The boy who will investigate will find that he may work up a sizeable trade in chair seating in a short time. In fact several boys will not overcrowd a given field. Such work will pay the amateur well. He does not, nor cannot expect professional wages. It is of considerable value from the pupil’s standpoint alone, that is, this correlation with his manual school activities. The amount [Pg 27] of pay initially is not the main question; it is the educational value derived. He would undoubtedly find willing help at his shop at any time a job of peculiar treatment presented itself.
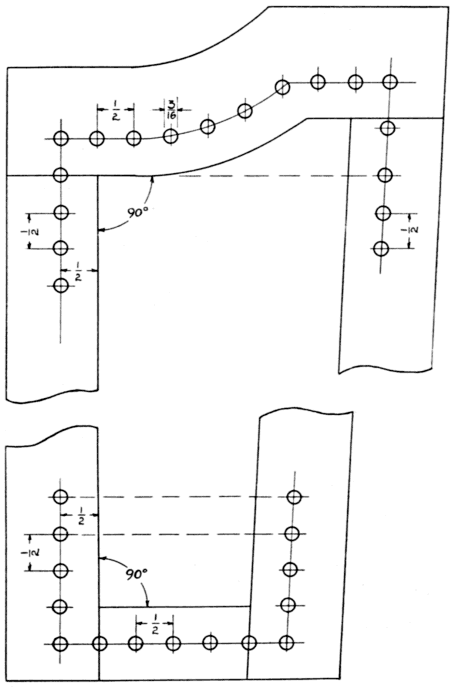
The Process.—Many chairs which the owners would wish hand caned have no holes bored for the work. They previously held machine woven cane. Fig. 19 shows a sketch of a chair bottom of ordinary or standard shape. The area is irregular. The sketch shows the method of determining the location for the holes.
As stated in the discussion of the seven steps in caning, the holes are invariably ½ in. from the inner edges of the rails. In this instance the line from which the holes for the front rail are located is parallel with the front rail; it is coincident with the line on which the holes are bored. The line on the back rail must be parallel with it; the line runs thru the center of the center hole. The lines on the side rails are parallel to each other and at right angles [Pg 28] to the first two. These four lines are shown as dash lines on the drawing. Their function is simply to determine the location for the holes to be bored on the lines ½ in. from the inner edges of the rails. Those lines are shown in the sketch as full lines.
When the working lines are determined, the centers of the front and back lines are located. The lines connecting corresponding holes on the front and back rails must be parallel to the line connecting the center holes on these rails. This rule applies to the locating of the holes on the side rails. It also applies to any seat of odd shape. The distance between holes will vary somewhat at [Pg 29] different places on the seat frame. This is the result of working to rule, and is necessary to keep strands equidistant and parallel. At times respacing at several places will be necessary. When it is, simply redivide into as nearly the given dimensions as possible.
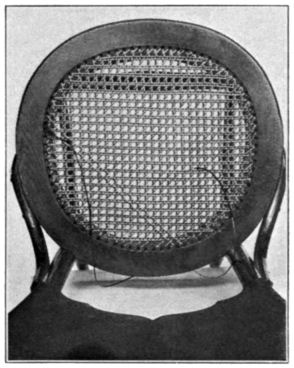
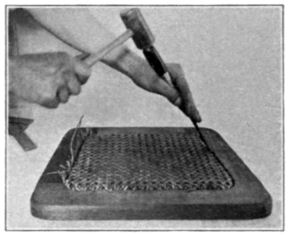
After the holes have been bored and cleaned the seat is ready for caning. Start at the center hole in the back. Pull the cane up thru this hole and across the frame, and down the center hole in the front. Work both ways on the frame. Fig. 19 shows a cane started in this manner. It is best that the amateur work from the center, both ways. He may begin otherwise when he understands the work better. The caning operations on the seat to be shown are the same as those described in the seven steps in caning. They never vary. The only new thing involved here is the shape of the seat. Fig. 20 is a photograph of a chair seat of an odd shape, an irregular ellipse. It shows the first step half completed. Note here that the last strand skips two holes, one at the front and one at the back. This is necessary to keep strands as nearly the same distance apart as possible. Fig. 21 shows the first step completed [Pg 30] and the second partially so. It is not necessary to start at the center with this series, altho it is advisable with the beginner. Note that two holes have been skipped here, as in the first step. Fig. 22 shows the second step finished and the third under way. These strands run directly over those of the first series. Pegs are always used to keep strands taut. Their proper use has been explained. Fig. 23 shows the third step completed and the fourth under way. This shows the actual weaving, and the method of using the needle. It has been pushed thru in the manner previously described; and is shown threaded, ready to be pulled back, thus making the weave. The needle may not be used, but will do the work rapidly. Handwork alone here is tedious. Fig. 24 shows the diagonal weave under way. In Fig. 25 this weave is completed and the second diagonal started. Fig. 26 shows the method of fastening the binder. This has been described.
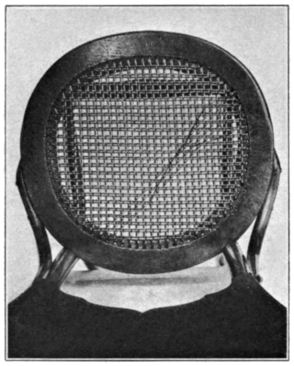
The first three series of strands should not be pulled very tight, [Pg 31] otherwise the final weaving will prove difficult. The finished seat, when dry, should ring when struck sharply with the fingers.
The method of tying cane, preventing twists, etc., has been explained. Reference should be made to these points, when anything is not fully understood in this discussion of chair seating.
Note that many holes have been skipped in each series, especially in the last two, and also that more than one diagonal of a given series enters the same hole. In every case it will enter that hole which leaves its course in as straight a line as possible. In rectangular areas it is never necessary to run two diagonals into the same hole, except at the corners. This applies to two diagonals of the same series.
Refinishing.—The refinishing of a chair is a distinct problem, and one which the cane weaver should understand. He should acquire ability for finishing along with skill in caning, inasmuch as a chair which needs a new seat invariably is in need of refinishing. [Pg 32] The method is as follows: Remove the cane from the seat. If the finish is in fair condition merely wash the chair with warm water and soap. When dry sand the surface somewhat, wipe clean, and follow with a coat of good varnish. In forty-eight hours rub with pumice stone and oil, and follow with an application of furniture polish, well rubbed. A good polish which may be made in school shops is composed of two parts of raw oil, two parts of turpentine, one part vinegar, and a very small amount of alcohol. Boiled oil may be used in the absence of the raw product. Shake the container constantly when using, for the parts are almost all merely held in suspension.
Should the chair be in poor condition, remove all varnish with any good varnish remover found on the market. Apply as directed with a stiff brush, running the solution well into all crevices. Later rub off the softened finish with excelsior or burlap. A scraper, an old plane bit, or a rather dull chisel will prove effective in corners and recesses. Apply a second coat of remover if conditions warrant it and clean again, then when the surfaces are dry, sand until clean and smooth. Follow with a coat of oil stain of the color desired; then two coats of varnish, allowing each coat to dry 48 hours. Sand the first coat lightly, and rub the second with pumice stone and oil. A filler is not generally necessary in refinishing. The ground coat may be of shellac instead of varnish if the worker prefers it. The chair need not be stained if it was finished natural originally.
In caning the seat special care must be exercised to avoid [Pg 33] marring the varnished frame. If the needle is used in the fourth step the frame needs protection from it. Pieces of bristol or card board may be placed under the needle on either side of the frame. The needle is bound to mar the surface of the frame if this precaution is not taken.
In many instances it is policy to cane the seat after the old finish has been removed; this to avoid any possibility of marring the seat frame later. However, it is better practice to refinish the chair first, and cane the seat last.
SUGGESTIVE PROJECTS.
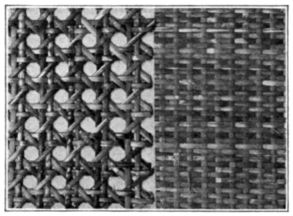
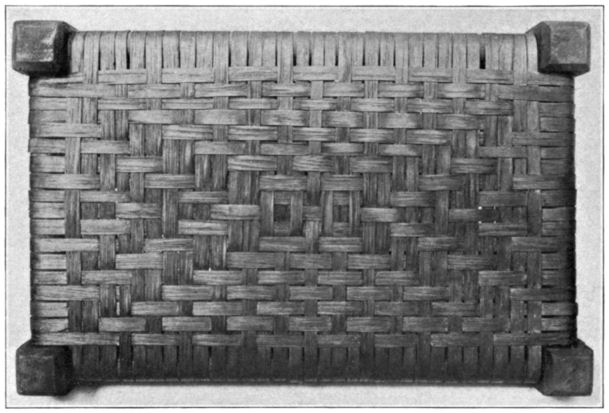
The seating of chairs with machine woven cane is a much simpler process than that of hand caning them. Under similar conditions less time and skill are required on areas of like dimensions. Machine woven cane, as its name implies, is a manufactured product made on power looms or machines. Commercially it is sold under the name of cane webbing. It is obtainable in widths ranging from 8 in., increasing by 2 in., to 18 in., and in rolls of indefinite lengths. It may be procured in meshes of varying fineness, utilizing cane of various sizes. In specifying open woven cane it is necessary that the purchaser indicate his wants in essentially this way: Ten feet medium open woven cane webbing, of No. 1 fine cane, 12 in. wide. A roll of such cane has been referred to in Fig. 18.
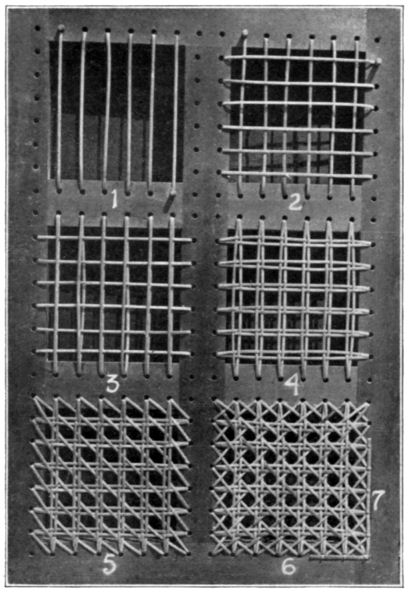
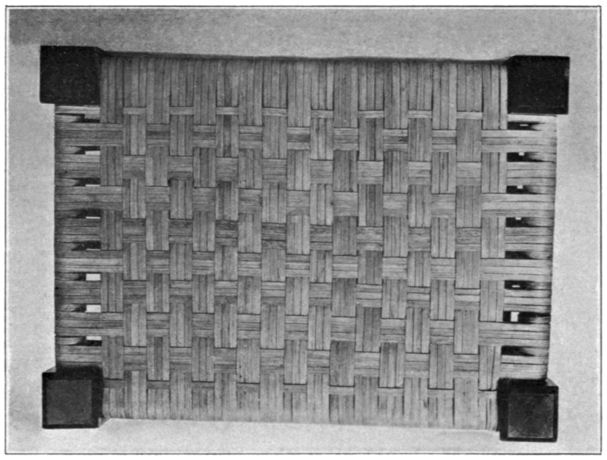
Cane webbing may also be purchased in close woven, in both the plain and diagonal weaves. The specifications for purchasing are identical with the open woven except that the term close woven is specified together with the character of weave. Fig. 27 shows cane webbing approximately half size, in open and close woven meshes.
As in hand caning, any boy with proper inclination who has had the necessary experience in the shops, may avail himself of the opportunities for seating chairs in his community. The educational and pecuniary advantages are identical to those mentioned in relation to hand caning. The relative ease with which he may acquire skill in handling the materials precludes satisfactory workmanship for prospective customers.
The cost of jobs is readily determined, for the amount and cost of webbing is easily ascertained, and experience soon determines the length of time required. Cane webbing costs approximately [Pg 35] as follows: For 12 in. widths, 21 cents; 14 in. widths, 26 cents; 16 in. widths, 30 cents; and 18 in. widths, 38 cents. This cost applies to open woven and is the charge per running foot. Close woven is sold by the square foot at about 30 cents, regardless of width. It is possible to procure special wide widths, but these are not generally found on the open market.
For example, a chair seat which requires a 12 in. square of open woven webbing, and which has the groove made, may be reseated for 50 cents. The entire job could be finished in about half an hour. This may be made less if several chairs are to be reseated at a time. However, it may be termed the minimum charge consistent with fair money returns. There are instances when the seat frame requires grooving, and inasmuch as running it in by hand is a laborious and tedious process the worker must of necessity carefully estimate time before he determines upon charge.
The Process.—The following may be termed the steps in inserting cane webbing. No special difficulty should be encountered in properly seating the frame at the first attempt.
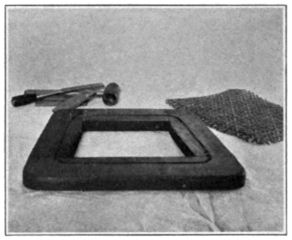
Step 1. Fig. 28 shows a commercial chair seat with groove cut by a router after it has been assembled. There are no angles on the seat. The groove is standard, with dimensions ¼ in. deep and ³⁄16 in. wide. This groove may be cut by hand with a universal [Pg 36] plane and chisel before permanently assembling the parts. In fact this is a necessary procedure in grade schools and other schools where special machine tools are unavailable. The necessary tools for pressing in the webbing lie near the frame, Fig. 28. These are a small mallet, a chisel, and several hard wood wedges. The wedges are made in several widths, to enable them to enter the groove at the abrupt curves, are 4 in. long of ¼ in. stock, tapered to ⅛ in. on the faces.
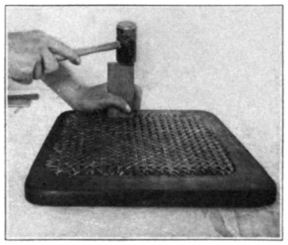
Step 2. The cane should be boiled in water for a minute or so, or allowed to soak for several minutes in warm water until thoroly pliable. Then lay it on the frame and cut it to the shape of the seat, allowing half an inch excess around the entire piece. A pattern of card or bristol board will prove of material assistance to the amateur as well as the expert. The front line or edge of the pattern must run parallel with the horizontal or vertical strands of cane. Pull out all weavers at the edges of the piece of cane where they run over and parallel with the groove. Then lay the webbing over the frame, and see that the weavers run parallel with the front of the frame. With wedge and mallet as illustrated in Fig. 29 begin at the front and force the webbing into the groove. Insert on the opposite side next, then the other two sides in order. The curves may be done last.
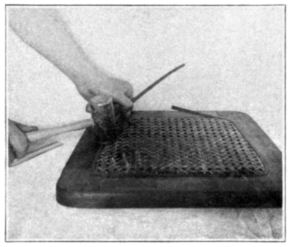
[Pg 37] Step 3. The edges of the webbing will project up beyond the groove. These are cut off as illustrated in Fig. 30 by means of a mallet and chisel at the outer edge in the bottom of the groove. Run either liquid or hot glue into the groove. An oil-can with large holed nozzle is excellent for this purpose. The liquid glue should be heated if used in this way so it may flow easily. This glue is to be recommended for the amateur in that no great haste is required as in the case with hot glue. A small stiff round brush will serve the purpose very well in absence of the oiler.
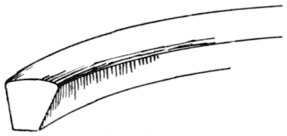
Step 4. Fig. 31 shows the method of inserting the spline. Splines may be had either of wood or reed, are curved on the upper edge and wedge shape in cross-section. They are standard in width and thickness and will fit a groove of the size indicated in Step 1. Fig. 32 is a freehand sketch of a spline, showing particularly its shape in cross-section. Wood splines, preferably of hickory, may be purchased in 5 ft. lengths, and reed splines in lengths of 8 or 10 ft. Both hickory and reed are recommended because of their pliability and ease in handling. Steam or soak them in hot water until thoroly pliable; then insert in the groove as illustrated. Note that the joint is made at the rear of the seat. The mallet used is of rawhide and will not mar the spline. A wooden mallet of small size is a satisfactory tool. Cut off the extra length of spline with the chisel, force the spline down nearly flush with the frame with mallet and wedge, sponge off the excess glue from the surface, and allow the webbing to dry.
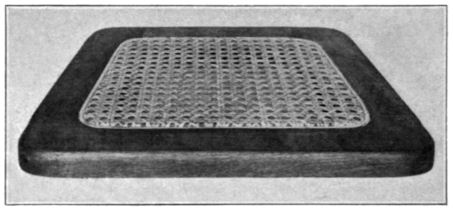
[Pg 38] Step 5. The finished seat is shown in Fig. 33. As the cane webbing dries it becomes taut, and irregularities of the surface, if not too pronounced, will disappear entirely. Therefore, the worker need not consider them primarily. Light sanding of the cane when thoroly dry will eliminate the small hairlike projections on the surface. Singeing the surface with a blow torch or gas flame will do the work more effectively, but great care must be exercised to avoid burning the webbing itself. The singeing must be done rapidly and the flame not be permitted to remain at one spot more than an instant. Dampen the surface to minimize the danger of burning.
The chair shown in Fig. 34 was made by an eighth grade boy. The slip seat is upholstered, and a panel of cane webbing utilized on the back. In instances of this character where the area is rectangular, splines are cut, mitered, and fitted previous to inserting the webbing. The splines are used dry. Manufacturers, in instances where the seat area is all curved, [Pg 40] generally fit the pliable spline, allow it to dry, and then insert it with the webbing. This assures tight joints. This procedure is not recommended for the ordinary shops for the simple reason that the shrinkage is not appreciable.
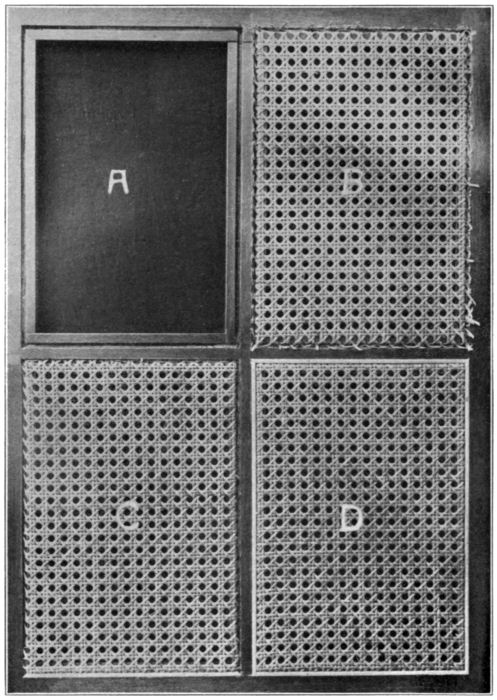
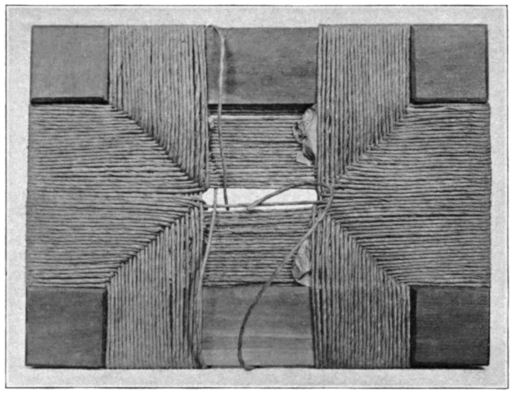
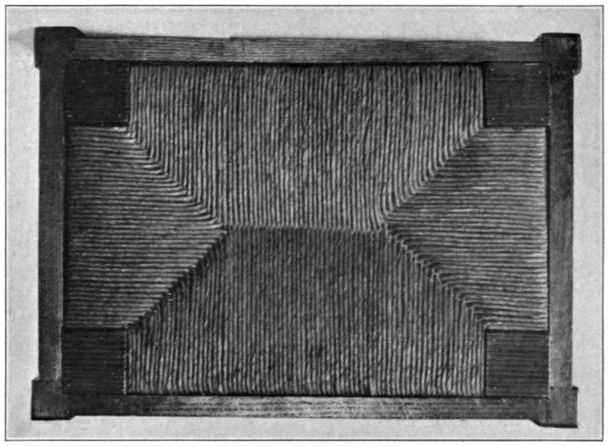
The frame illustrated in Fig. 35 is purely supplementary to the steps, but as with the Seven Steps in Caning, it should be used in demonstrating the processes to classes. It materially assists in making the processes clear to the students, previous to allowing work on their projects, and assures a general understanding, at least, of proper procedure. The different panels are lettered for convenience and need no elaborate explanation:
A is the open frame with grooves cut for the webbing.
B is the webbing inserted with ragged edges exposed, ready for cutting.
C is the webbing with edges properly trimmed and a spline inserted.
D is the completed panel.
Inserts of cane webbing may be utilized on pieces of furniture other than seats. These inserts could be used on every article illustrated in Chapters I and II, with similar pleasing effects, and with less labor. However, there is an obvious element in hand caning which naturally and logically gives it precedence over the inserted cane.
Rush seating, employing either genuine rush or substitutes, may be done to good advantage and with excellent results in manual training shops. No equipment is needed to maintain such work. The addition of a woven seat to a chair or stool constructed in the shops will necessarily employ a new, interesting medium in conjunction with woodwork; and materially increase the pupils’ knowledge of materials and possible combinations. And, as with caning, the resultant interest in the work at hand more than justifies its introduction in manual training shops. Rush seating employs a very simple weave. Different materials employed in weaving naturally require different degrees of skill, and the difficulties encountered are those resulting from handling materials and not because of the complexity of the weave. One may very readily undertake the rushing of ordinary seat frames after a study of printed directions and illustrations. It should be understood at the outset that, in discussing rush seating, materials other than genuine rush are included in the term.
Historical.—In the British Museum in London is a seat of curious shape of Egyptian manufacture, which, it is estimated, was made previous to 4000 B.C. A small amount of rush still clings to the seat frame. The relative date of the construction and weaving of the chair seat would indicate that rush seating is by no means a modern art, altho at present rush is extensively employed in furniture.
The use of rush in England dates no earlier than 1720. Several types of chairs were made there between that date and 1870. In France rush was used extensively in the seating of furniture of Normandy and Brittany about 1750. Flanders produced rush [Pg 42] seated chairs at an early date, and many were constructed in this country in early colonial days, prior to 1776, as well as later. Such chairs were undoubtedly patterned after those brought over from Holland, France, and England to the early settlements in America both before and after the Revolutionary War.
In early times rush always served a function in the seats of chairs and stools, and was very seldom if ever used on the better class of furniture. The use of cane or rush on furniture for decorative purposes only is distinctly a modern idea. Utility rather than beauty prompted the introduction of seats of rush.
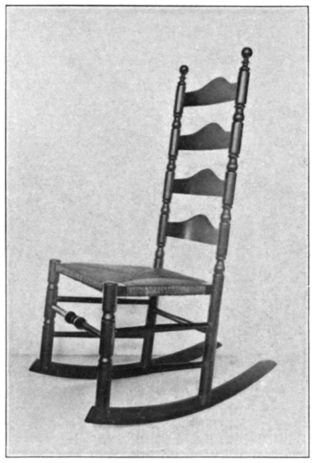
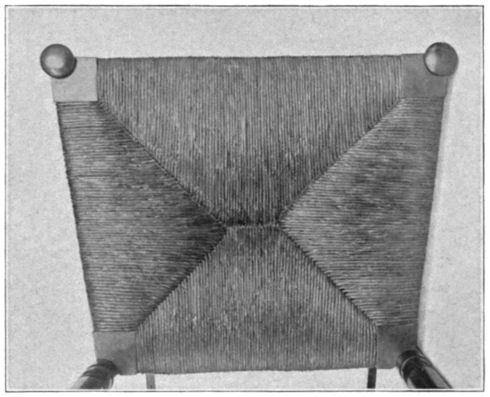
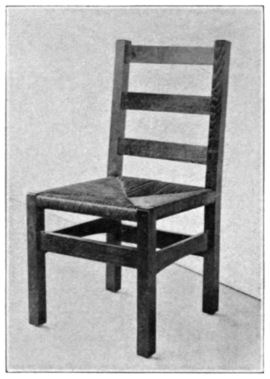
Modern furniture of excellent design and workmanship employs rush seats. These are either woven over a separate frame and inserted or are an integral part of the chair, being woven over the seat rails of the chair itself. Fig. 36 shows a modern adaptation of a ladder back chair with rush seat. The rush on this chair is woven over the rails. Fig. 37 shows a flat view of the seat.
Rush.—Rush is the name applied to many fistular, stemlike plants of similar or like growth. Properly, rush belongs to the sedge family. The different species vary greatly in appearance; some are low and slender, some are tall and leafless, and some are broad leaved. They are found in wet places thruout the northern hemisphere, along banks of sluggish streams, and in lowlands and marshes. [Pg 43] The great bulrush is common and familiar, while the chair-maker’s rush is not as well known. The plants most commonly known as rush are called by the names of flag and cattail. In fact, flag and cattail are very generally used for rush seating. The technical names of the different species of rush are not pertinent or desirable here.
Other Materials.—Materials other than rush may be used for rush seating, as has been stated. Rush is rather hard to manage in that no appreciable length may be handled because of the shortness of the leaf. Twisting is necessary. Fiber, or similar materials, is to be recommended for shop use because a great length is procurable, and the twist is made. It is made of machine-twisted paper, and comes in long indefinite lengths. It is tough, strong, and serviceable, and procurable in spools of about one hundred pounds each. Fig. 38 shows such a spool together with a bundle of rush. It is manufactured with or without a flexible wire center and costs [Pg 44] from 10 to 15 cents a pound. It may be had in several colors and sizes.
Raffia is well known thru its general use in basketry and allied work. In rush seating it has no conspicuous place, altho it may be utilized to great advantage. Raffia is the leaf of a certain palm, cut in narrow widths and varying in length from 2 to 5 feet. It is bought in hanks by the pound, bleached or unbleached, and in colors. The natural unbleached raffia costs about 25 cents per pound; colored about 75 cents. The hanks should not be untied, but as strands are needed they should be pulled out from the head end of the hank. If improperly handled, raffia will become badly tangled.
Corn husks, taken from close to the ear, may be used, particularly for seating chairs of toy furniture. The husks near the ear are not as coarse and brittle as those outside. The shortness of the husks precludes their general use, altho they produce an excellent seat when properly woven.
The materials mentioned by no means exhaust the list of available mediums for rush seating, but will give considerable and sufficient variety for shopwork. As the weaver comes to appreciate the limits and advantages of the various mediums for certain grade work, he may utilize local plants and grasses suitable for such work.
Preparation of Materials.—Rush—and in the term are included cattail and flag—is common to almost any locality in our northern states. It should be gathered when full grown and still [Pg 45] green. It is ready for cutting when the tips of the leaves begin to turn brown. This is usually about the middle of August. The leaves are tied in loose bundles for convenience in handling, and dried in the shade, preferably a darkened room. They should remain here until thoroly dry. Before using, soak the rush about ten hours in water. Less time is required if warm water is used. When it is soft and pliable it is ready for weaving.
Before weaving, the butt ends of the leaves are cut off about a foot from the base. These are too coarse and stiff to weave properly. One leaf may be used or two leaves may be twisted together to make a strand. Three leaves make a coarse strand, two a medium, and one a fine strand. A long, tight twist is necessary to produce an even, smooth strand. The twisting is always done in one direction. One leaf is recommended for beginners in rush seating, for adding to one is much simpler than adding to several. The under side of the seat need not be as smooth and as well woven as the top. In fact, twisting need not be done underneath at all unless the individual worker so desires.
Raffia is easy to manipulate because of its pliability, even when dry. Several lengths will need to be twisted together to produce a [Pg 46] strand of sufficient size. It requires little soaking to make it ready for use. Raffia produces an even, smooth surface of pleasing appearance, and is very desirable in a seat.
Fiber may be woven as it comes from the spool. However, it is better to dampen it by plunging a quantity in water and removing at once. When it dries after weaving, a slight shrinkage results, thereby making a tauter seat than could be woven with dry strands. Inasmuch as the fiber is paper, it cannot be soaked in water.
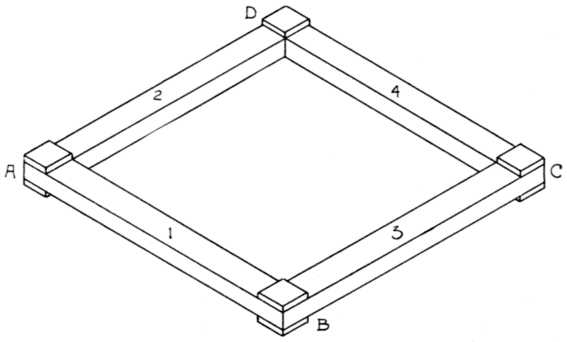
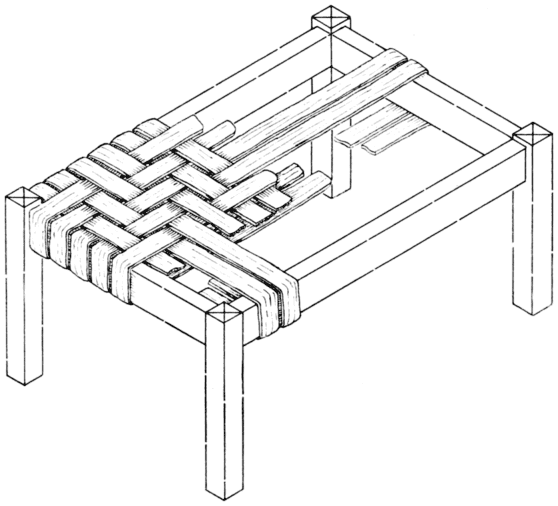
The Weaving Process.—With the frame ready and rush in proper condition the weaving may be started. Fig. 39 shows an isometric drawing on which corners are lettered and the rails numbered in order. Fig. 40 shows another drawing on which the corners and rails are similarly lettered and numbered, showing graphically the method of weaving the first strand. The arrows indicate the direction of weave. The operation is practically complete once around the frame. Reference may be made to either drawing in the following detailed directions for weaving.
Start arbitrarily at any corner—in this case, A. A strand of rush tightly twisted is laid over rail 1 next to the cap with its short end turned down. The beginner may find it advantageous to tack [Pg 47] the end in place. Draw the strand over the edge and bottom of rail 1 and up at the inner corner, then over the top and edge of rail 2. This binds the loose end in place if it has not been previously tacked. Pull the strand directly across the frame opening to the top of rail 3 at corner B. Draw it over the edge of the same rail and under, then up at the inner corner and over the top and edge of rail 1. Pull directly across the frame opening to the top of rail 4 at corner C. The operations at corners C and D are identical to those at A and B, and these repeat themselves indefinitely at each corner, or until the seat is completed. This applies to square seats only. The end of the last strand may be secured with a tack under the proper rail, or twisted around a strand underneath the seat.
The strand is twisted as the weaving progresses. This may be done with the palm of the hand and thigh, in much the same manner as a shoemaker waxes his thread. If one leaf of rush is used to make the strand, new leaves are added by tying the two ends in a square knot at a corner, or wherever such joining will not show on the finished seat. When more than one piece of rush is used for a strand the pieces should be of uneven lengths initially. One leaf or piece at a time is then added. The upper or top end of the leaf is used to begin the seating and each leaf added is attached at its top end.
Some expert rush seaters do not tie knots in making strands, but add leaves by twisting the end of the preceding leaf about the added one, “like the color on a barber pole,” as one old rush weaver remarked. Adding by twisting only is difficult, and requires great patience and dextrous handling of the material. In fact rush should be used by the more skilful boys only. Others may use the excellent substitute, fiber.
[Pg 48] Care must be exercised to keep the strands from overlapping improperly at the corners. The strands should fit snugly where they go over the rails. To assure this, tap them sharply with a mallet used over a block of soft wood. This may be done at frequent intervals or when several strands have been woven over each rail. Uniform tension on the strand is desirable and this should be tight.
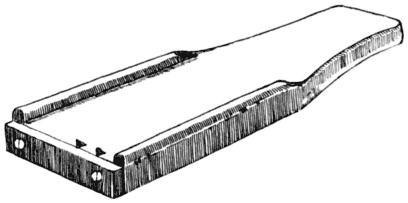
As the work progresses the interior between the upper and lower rows of strands is stuffed. This is done with the same material as that used in the weaving. The butt ends of rush are used to stuff the seat of rush; raffia is used to stuff a raffia seat; craft paper to stuff a fiber seat; and so on. The packing should be done in a thoro manner, for it builds up the seat and prevents its breaking down at the inner edges of the rails, and sagging with continued use. A slightly curved hardwood stick about 12 in. long may be used to advantage to do this work. Fig. 41 shows a sketch of such a stick. It is ¾ in. in diameter at one end and tapered to ½ in. by ⅛ in. at [Pg 49] the other. Considerable force needs to be exerted in packing, and caution used to avoid breaking strands.
Rectangular Seats.—As stated, in weaving a square seat the initial process is repeated at all corners until all openings are filled. In rectangular seats the spaces on the short rails will fill before those on the long rails. Weaving around corners is then manifestly impossible. Fig. 42 shows a partly woven seat with the short rails filled, and the process of filling up the remaining area under way. The method is this: Go over and under a long rail, across half the frame opening and up thru, then across the remaining distance, and over and under the other long rail. Repeat until the seat is completed. Fig. 43 is a sketch of a partly woven seat, illustrating the method of filling in the center just described. It supplements the photograph and makes the method clearer.
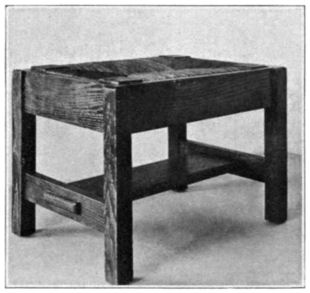
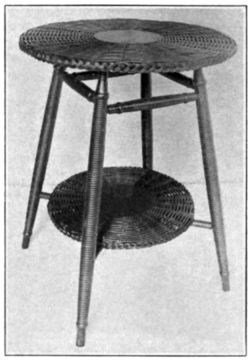
It should be noted that the strands in crossing at the center must be compressed one-half of their diameters. They will need to be tapped sharply with a small mallet or hammer to produce proper crowding. Fig. 44 shows a stool seat of fiber woven by an eighth grade boy. Fig. 45 shows the complete stool. The seat is woven [Pg 50] over a separate frame and inserted. Fig. 46 is a child’s chair of oak, with a seat of fiber woven over the rails of the chair.
Irregular Seats.—The usual or standard shape of chair seat is like the one illustrated in the drawing, Fig. 47. The front rail is longer than the back, and the side rails are equal in length. Seats of this shape are rather difficult to weave because special treatment is necessary to fill up portions of certain rails.
With reference made to the drawing, the method employed in locating lines for rushing, and for rushing such a seat is this: With the beam of a square laid against rail 4 with its corner against the cap at corner A, scribe a pencil line across rail 2. Similarly, mark the same rail using the square against rail 4 at corner D. Stated in other words, these lines may be obtained by determining the difference in length between the front and back rails, and laying off [Pg 51] one-half this difference from each corner on the front rail. This distance is indicated by the brackets in the drawing.
Now tie with a string as many strands of rush as will be needed to fill in this difference between front and back rails. Fasten them underneath the rail at corner A. Then use one strand, twisted, and weave around corners B and C and fasten under the rail at corner D. The weaving is identical to that described in square seats. Weave in each strand in the bundle at the same corners and tie under the rail at corner D; or until the spaces marked off on the front rail are filled. It may be necessary to add to or to remove strands from the bundle if calculations as to number of strands necessary were inaccurate. Tie all loose ends together at corner D, fasten securely and cut off all extra lengths.
Start now as in beginning a weave on a square seat, weaving around all corners in the regular way. The first strand around will effectively bind the bundles of ends at corners A and D.
Suggestions.—In using paper fiber or similar materials which come in long lengths, a strand 20 or 25 ft. in length may be used [Pg 52] at one time in weaving. For convenience in handling it should be formed in a loop and held together with a strong rubber band. The strand may be unlooped a little at a time as the weaving progresses. In using rush, raffia, and like materials, the strand is made as the weaver works, so at no time is there a strand exceeding 5 ft. or so in length to handle. No special expedient is therefore needed.
Raffia, fiber, etc., may be purchased from supply houses and in many cases direct from the manufacturers. Rush may be gathered in many communities by an energetic instructor and pupils, and properly cured. In fact, gathering the raw material and preparing it for use is desirable in many ways, and is to be encouraged. Ordinarily rush may be obtained from manufacturers of rush seats. It costs 15 cents per pound, dry.
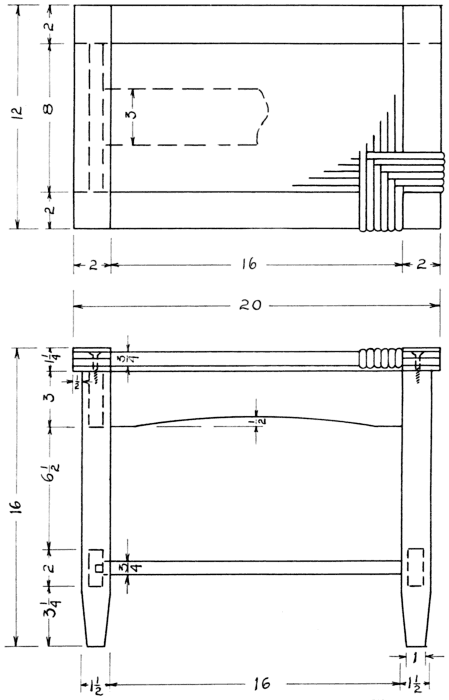
Fig. 48 is a working drawing of a stool or seat. The constructed problem would appear very similar to the one shown in Fig. 45. The seat frame is fastened to the base with concealed screws. The upper caps are temporarily fastened until the weaving is completed, [Pg 54] when they are removed and the frame fastened to the base as indicated. The caps are then replaced permanently. Generally speaking, for initial work in rush seating it is advisable to weave over a separate frame. Such a frame is conveniently handled, and better work will result.
Finish.—Some agent to preserve a rush seat is necessary. Rush should be coated with equal parts of oil and turpentine, followed by two coats of tough, elastic varnish. The necessary time should elapse between coats. Some manufacturers do not use oil, and apply varnish only. Raffia and husk seats should be treated as rush. Fiber is varnished only. A brittle varnish is to be avoided, for it will chip off with a little use, and a seat is subject to hard wear.
SUGGESTIVE PROJECTS.
Reeds which are used extensively for basket-making and weaving in general are procured from the species of palm described in Chapter I. These reeds should not be confused with the term reed applied to several distinct species of large water loving grasses. Such reeds are usually designated under the name of grasses. There are a thousand species of palm distributed over the tropical regions of the entire world, but only a few are native in the United States, and these are of no distinct commercial value. The rattan or cane palms of India and the Malay Islands grow to an unusual height, and are imported into this country in great quantities. These rattans and the trailing palm of the species Calamus have as main export centers Singapore and Calcutta. These palms are stripped of leaves and bark and split into round and flat strips of different diameters and widths. The outer bark, when stripped into proper sizes, is known as chair cane; the entire palm, with leaves removed, is commercially known as rattan; and the flat reeds are frequently sold as flat rattan and pith cane. Inasmuch as these flat and round strips, split from the palm plant and exported under the name of rattan are called reeds, we shall refer to them under that name in all discussions to follow. There are two qualities of reed on the market sold under the names of China reed and German reed. The former is inferior in quality and the latter is superior, being strong, tough and durable. The Philippine Islands give promise of producing a liberal supply of reed of good quality that is claimed to equal the German product. The problem, however, is one of gathering and marketing the product. The government has made a partial survey of the rattan supply, and this justifies the belief that the Islands will eventually compete with the world market.
[Pg 56] Primitive Methods.—Briefly the primitive process of converting the rattan, or raw material, into cane and reeds, or the finished product, is this: The rattan stems are thoroly dried or seasoned, and the nodules are pared off with a peculiar native knife. Then the rattan is sorted into sizes and selection made as to grade. The sorting is based upon external color and diameter of the rattan. The rattan is then immersed in water, and the stem is rubbed vigorously with sand and cocoanut husks to remove dirt and foreign substances. It is then bleached by means of sulphur fumes, either in the stem or after the peel and core have been prepared.
The method of preparing the peel and core is this: The peel, or outer covering, is removed with a heavy knife; it is then stripped to selected thicknesses and widths by drawing it by hand thru two knives set at required distances apart. This peel is commercially called cane. The core is then stripped into as many strands as necessary, depending upon the diameter of the cores required. These are rounded by drawing them thru a sheet of tin or iron perforated with holes of different diameters. The rounded cores are called reeds.
Considerable rattan is still converted into the finished products by hand processes thru these laborious stages. Machines have been perfected which do practically the entire work. Particularly have the Germans brought this industry to a perfected state. Still in various sections of India, China, and the Philippines hand working of rattan is a thriving industry; an industry seemingly peculiarly adapted to the natives. The Philippine method of preparing the raw material varies somewhat from the Chinese method in that the natives do not bleach the rattan.
Reed may be procured in large or small hanks, in coils and in bundles, with the cost determined by weight. Schools generally will find it advantageous to buy it in small hanks, because of ease in handling and for economic reasons. Round reeds are shown three-fourths size in Fig. 49, from No. 0 to and including No. 7, also winding, half-round and flat reeds. Winding reed is thin and [Pg 57] slightly rounded on one surface. Half-round is as its name implies. Flat reed may be obtained in several widths from ¼ in. to ½ in., and if of good quality, one surface will show a decided bevel on the edges and appear much smoother than the other. Thus the right side is determined. There are many more sizes on the market than are indicated in Fig. 49, but those shown should supply adequate, if not liberal variety for the ordinary school shop. The cost of reed cannot be given with any degree of accuracy at present. The price is determined by the quantity bought, and by the quality and size. Under normal commercial conditions round reeds will cost from 30 cents to $1 per pound for Nos. 1 to 8, and flat reed about 25 cents per pound.
Bleaching.—Reed is procurable either bleached or unbleached. Ordinarily it is better to buy the bleached product. However, if the worker desires to bleach the reed, the method for small quantities is as follows: In a tub two-thirds full of water dissolve ten pounds of chloride of lime. Immerse the reed in this solution, weighting it down to insure covering it all, and let it stand about [Pg 58] 4 hours. Remove it from the tub and wash thoroly in running water. The best way to do this is to lay the reed on an inclined surface and turn a forceful stream of water upon it. Chloride of lime has a bad effect upon the hands in that it makes them sore and tender, so care must be taken to properly rinse the reed. A little tallow rubbed over the hands will materially offset the tendency to tenderness, and generally keep them in good condition.
Staining.—Bleached reed takes stain much more readily and evenly than does the natural or unbleached. It may be stained any color with prepared stains, but ordinarily these leave the reed muddy in appearance due primarily to the difficulty in brushing in or wiping off the stain in the recesses which weaving leaves. Perhaps the best agent for coloring reed, and at least a very desirable one, especially after it has been woven, is naptha. The preparation of the stain and the process of coloring is as follows: Obtain the necessary amount and variety of colors ground in oil; mix the required colors with a little naptha; then to determine the shade of color test with a reed. Reed absorbs a given amount of color, therefore the shade will prove out practically the same when tested with a small quantity of naptha, as when tried out with a greater amount. Add the required amount of naptha to the solution, avoiding thinning too much; otherwise the color produced will be “sickly” in appearance. Five pounds of color to about 3 gallons of naptha will prove about the right ratio. For instance, to obtain a rich nut brown mix 1 pound of chrome yellow and 5 pounds of burnt umber with a small amount of naptha. Stir until the colors are liquid, then gradually add 4 gallons or so of naptha, and stir well. The intensity of the brown may be varied by using more or less chrome yellow.
Coiled hanks of reed may be immersed in the solution, immediately withdrawn and hung to drain dry above the receptacle, thus permitting surplus stain to drain back into it. The stain may be used repeatedly, and as it is very volatile it should be kept in a tightly corked red can when not in use. It is also highly inflammable, [Pg 59] and should be used in a room in which there is free circulation of air. If colors have been mixed properly and thinned to the right consistency, the reed will dry rapidly and the color will be sharp and clear, free from muddy effects.
A woven article such as a basket or woven top footstool may be dipped, or the color poured over and allowed to drip dry. In some instances it is good policy to wipe surplus stain off lightly. Then, in the case of the footstool or similar project, if the worker so desires he may stain the wood a darker shade than the top with a prepared stain. Reed is very effective without stain; many of the stools shown herewith are left natural. Reed may be shellacked or varnished. Because of its porosity it soils very easily unless some finishing agent is used, and a good grade of elastic varnish is recommended as a finish, especially when the woven article is subject to severe use.
Other Materials.—Reed is not the only good medium adapted to weaving, either in correlation with wood or when used alone. On the stools illustrated several other materials have been used, as inner hickory bark and Indian splints and fiber. Binding cane, rope, and even willow may be utilized with success. Paper fiber was discussed in detail in Chapter V and needs no elaboration. Fig. 60 shows a stool partly woven with this serviceable material. Sufficient to say that this fiber adapts itself admirably to almost all work where reed is commonly employed, and in many instances is, commercially, supplanting reed.
Inner hickory bark may be obtained of manufacturers of rustic furniture either directly or indirectly. They may be obtained first hand if hickory trees grow in the locality, thus enhancing the educational value of weaving. In the spring or early summer when the sap is up and the bark slips easily, a hickory tree may be cut down, and the rough outer bark shaved with a draw knife from the top of the log the full length of the trunk, leaving a surface from 8 in. to 10 in. wide. With a heavy knife split the inner bark on either side of the shaved strip; then beginning at one end peel [Pg 60] back the inner bark the full length of the log. This process may be repeated until the log is stripped. The thickness of the inner bark depends upon the size of the tree and the species. Manufacturers of hickory furniture claim that the pignut possesses a thicker bark than any other species, the bark running from ¼ in. to ¾ in. in thickness, and they accordingly use this tree in preference to others when available. The rolls of thick inner bark are allowed to dry for several weeks. Then they are placed in water, to remain until pliable. They are then split into strips of proper thickness and width. Factories use a very simple motor driven machine for making the strips, and any manual training shop can devise some scheme for accomplishing this work. These strips cut in indefinite lengths must be made pliant by a thoro soaking just previous to use. In weaving they should be pressed close together with the fingers or with the aid of a hammer, as there is an appreciable shrinkage especially in their width upon drying. Such strips are used mainly by builders of rustic outdoor and porch furniture for the weaving of the backs, arms and seats of chairs, and have at present no general use in school shops. Their use here should be encouraged. If bought of the manufacturer these strips cost 40 cents per pound, dry. They are put up in coils, and are ¾ in. wide and ¹⁄16 in. thick. They may be stripped into narrower widths by means of a hand stripper, soon to be described.
Indian splints of ash and hickory may be obtained from dealers [Pg 61] in the raw products. These strips are cut from the wood of the tree in long shavings in a manner similar to obtaining the inner hickory bark, and stripped into desired widths and thicknesses. One kind of ash splint is made in three weights or thicknesses, fine, medium and heavy, and in strips 1½ in. wide. It is sold in coils of 200 ft. each at $8.00 for 4,000 ft. The strips are a number of feet in length. Hickory splints are sold in coils of a dozen strands each. These strands are 8 ft. to 10 ft. long by ½ in. wide, and slightly less than ¹⁄16 in. thick. A coil weighs about three-fourths of a pound and costs 5 cents.
The ash splints particularly, need to be restripped to widths needed by the worker. For ordinary purposes the hickory strips are right for seating purposes. The stripping is done by means of a combination hand stripper and gage shown in Fig. 50. A working drawing of it is shown in Fig. 51. It is made of maple preferably. The cutters are of a watch spring, pointed and sharpened as indicated. The end piece is removable to permit changes of the cutters. To use, merely hold the splint flat between the right hand and stripper, press the strand down on the cutter and pull it across the cutters with the left hand. Two persons may do the operation more readily and speedily than one. It is a good policy to make several of these devices with cutters at different distances apart so [Pg 62] splints of various widths may be cut without resort to a change of cutters.
Splints need to be soaked in water for a number of minutes before using. They will be found to be somewhat less pliable than inner hickory bark, and different in color, varying from almost white to a light brown. Inner bark is a nut brown in color. The splints stain well, and may be dipped in identically the same manner as reeds. Inner bark needs no stain; in fact is more pleasing if left natural.
Ash splints are extensively gathered and prepared by the Indians in certain sections of Canada and the northern states. There they are woven into baskets of intricate design and beautiful colors, usually in combination with other materials, as sweet grass. Splints may be used for almost every purpose for which flat reed is utilized, and in numerous cases is superior and preferable to reed.
In Fig. 52 is shown in order, two rolls of hickory splints, a bundle of inner hickory bark strips, and a small hank of flat reed. These are in the original bundles as they come from the dealers.
The discussion of the weaving processes to follow is confined, in the main, to stools or seats. Fig. 53 shows several stools different in design both in wood construction and in weaving. In two instances it will be noted that weaving is done over a separate frame, one being inserted between the rails, the other fastened on top, leaving a little projection. Reference is made to several possible weaving designs and the use of various mediums and combinations. The possible combinations of materials are merely suggestive of possible other ones, and the individual worker will find that many designs of varying complexity may be worked out. An excellent method for working out possible designs is that of using black and white paper strips ½ in. in width. The design will show up very clearly because of the contrast of the black and white. Experimenting with the weave on the seat itself is rather tedious and unsatisfactory. The paper strips are an excellent means to an end.
The stool top illustrated in Fig. 54 employs a simple over-and-under weave, utilizing flat reed. The worker needs to decide at the outset on the character of weave to be used unless it be of unusual design. In this instance the weaver runs over three and under three strands, and the wrapping done in a series of three. To begin the operation tack an end of flat reed under a short rail at a corner, then bring the strand out and over the rail, across the frame opening to the opposite rail, under this rail, across underneath the frame opening to the bottom of the first rail. This completes the process once around. Repeat three times; then wrap the strand around the two rails, without running it across the top. Thus every fourth strand across the top is omitted. It is not necessary to cut the strand; the wrapping is continuous. Repeat [Pg 64] these series of three strands until opposite short rails are entirely wrapped. When a strand runs out tack the end with the beginning of a new one underneath a rail. Use a one ounce flat head wire tack for this purpose if available, otherwise a one ounce cut tack will do. The weaving proper now begins.
Tack a strand underneath a long rail at a corner, then weave over three strands and under three. Repeat in the same manner [Pg 65] three times, then weave over the series which were woven under before and repeat alternately until the top is entirely woven. In weaving the top of this stool one strand is woven in the last series of three, and to balance it a single strand is run in on the opposite side. The ends of this strand are not fastened in any particular way; the weaving holds them in place. The spaces next to each short rail may be filled in a like manner if desired. Strands crossing underneath the frame must be woven in some manner to produce a seat of maximum strength. The character of the weave here is not pertinent; in this instance it might take the same form as the top.
Fig. 55 shows a stool top woven of inner hickory bark strips employing what is termed a diagonal weave. Begin the wrapping on either the short or long rails. In this instance we will assume [Pg 66] that the short rails have been wrapped; then the weaving will begin over the long rails, and as indicated, at the upper left hand corner. The strands have been numbered to make the description clearer. The “diagonal” is determined at the edges of the upper rail. The method of weaving may be expressed in the following manner:
Strand 1—Over 1, under 2, over 2, under 2, and so on.
Strand 2—Over 2, under 2, over 2, under 2, and so on.
Strand 3—Under 1, over 2, under 2, over 2, and so on.
Strand 4—Under 2, over 2, under 2, over 2, and so on.
This completes the series or unit, and this unit repeats itself until the area is woven. For instance, the fifth weaver follows the same course as the first; the sixth weaver follows the same course as the second; the seventh the same as the third; and so on. The diagonal effect will remain the same were the weaver to run over [Pg 67] three strands or more, providing the right start is made at the edges of the frame. In using inner hickory bark care must be exercised to keep the strands close together, for they shrink appreciably in drying. A brad hammer with square face is an excellent tool to use for keeping the strands snugly together.
A combination of half-round and flat reed is illustrated in Fig. 56. The half-round reed is wrapped about the frame first, and in this case every other strand is wrapped around the opposite rail, crossing underneath the frame only. The diagonal weave is employed, and is identical to the one just described in general effect. However, the weaver runs over three and under three in the body. Note the difference in the weave at the edges of the rails. When using half-round reed it is necessary that every other strand be [Pg 68] wrapped completely around the rails, for otherwise it would prove practically impossible to weave the area because of the thickness of the reed. A winding reed as shown in Fig. 49 or binder cane could be run continuously, inasmuch as either is relatively thin. Weaving with two kinds of reed will produce an area of pleasing high relief.
Fig. 57 illustrates a stool woven in flat reed. The diagonal weave is used running toward a common center, and it forms a diamond pattern or design. Begin wrapping on the long rails, skipping every other strand on the top as indicated. To weave this pattern it is necessary to locate the center of the short rails and the center strand of those running across the frame. In this instance the strands are even in number, so the pattern does not begin at the actual center, but a little to the right or left as the case may be. Beginning at the center, count by twos, over, under and over, under and so on to determine the number of strands to go over or under [Pg 69] at the edge of the frame. The first strand runs over one at the center, and over two and under two on either side. The second strand runs under three at the center, and over two, under two on either side; the worker must again count to the edge of the frame to determine the beginning weave, until the unit of four strands has been woven. Then the unit repeats itself at the center and at the edges of the frame. Beginning at the right side of the illustration the weaving is as follows:
Strand 1—Over 2, under 2, over 2, under 2, over 2, under 2, then over 1, and repeat across the other half of the frame.
Strand 2—Under 1, over 2, under 2, over 2, under 2, over 2, then under 3, and repeat across the frame.
[Pg 70] Strand 3—Under 2, over 2, under 2, over 2, under 2, over 2, then under 1, and repeat across the frame.
Strand 4—Over 1, under 2, over 2, under 2, over 2, under 2, then over 3, and repeat across the frame.
These four strands comprise the unit, and it is repeated until the frame is entirely woven. Complete half of the frame first, then weave the other half, which is just the reverse of the first half. In starting the weave for the second half, strand 1 is omitted, for it is the center of the frame. After the worker has worked out the unit according to the method described, he will find it good practice to write it out graphically as above to use in weaving the seat. The unit above applies to the particular stool, and will not hold good on seats utilizing more strands, or fewer. Errors are easily made in weaving this pattern for the reason that strands need watching at two places. The seat of the stool at the top of the [Pg 71] group shown in Fig. 61 has a pattern identical with this one, except that the strands both ways are close together.
The top illustrated in Fig. 58 is practically the same in design as the one just described. The weavers run over the long rails in this instance, instead of the short ones, and half-round reed is used for the weavers, with flat reed utilized for the wrapping. The first weaver of half-round reed runs under the center strand, and the two second weavers run over three strands on either side of the first, at the center of the area. The combination of the half-round and flat reeds produces a seat both pleasing and serviceable.
Fig. 59 illustrates a stool top woven with flat reed entirely, in a design the very opposite in effect of that shown in Fig. 57; instead of evolving a diamond effect the diagonals appear to radiate from a common center. The method of weaving is identical to that of Fig. 57 in that the operation begins at the center of rails instead of next to the posts. The first weaver is woven over the center [Pg 72] strand at the center of the top, and the second weaver, on either side, is woven over three strands, at the center. These three weavers practically determine the design and effect produced. An error of no vital importance exists in this particular stool top. It will merely emphasize the fact that particular care is necessary to avoid mistakes.
Fiber is the material used for the top of the stool shown in Fig. 60. The diagonal weave is employed. The process of weaving has been explained and needs no further discussion. The fiber is the same as that discussed in Chapter V. It adapts itself admirably to this form of weaving, and when properly finished with varnish makes a serviceable seat, pleasing in every particular. The strands which run across the frame in the wrapping must be some distance apart, otherwise weaving would prove impossible. The thickness of the strands preclude their being wrapped close together as in the case of thin materials. In this case a space equal to the width of three strands is left. The weaver runs over two and under two strands in the body.
While reeds and inner hickory bark shrink in drying, they will shrink mostly in width and not much in length. Therefore it is necessary to pull all strands, both in wrapping and in weaving, rather tight at all times. Only by doing this will the worker be assured of an ultimately taut seat. This applies also to the Indian splints now to be discussed. As fiber is woven practically dry it needs to be pulled particularly tight.
Indian Splints.—Fig. 61 shows a group of stools and a waste basket constructed in eighth grade shops. The tops of the stools and the panels of the basket are woven of hickory splints ½ in. in width. A variety of patterns is shown, and these will suggest other ones. One of the stools has turned posts and the splints are carried over the sides of the rails. With slight modification of the structure, the sides might be woven in a similar manner to the top. The panels of the basket were woven over a separate frame, then they were cut to fit the frames of the basket, and finally tacked on [Pg 73] the frames. The edges of the splints were covered with thin wood strips held in place with brads. These panels should be inserted and secured while damp to assure proper tautness, and to prevent as far as possible splitting the ends of the splints in tacking them to the frames.
It is not advisable to tack splints onto seat frames, either as an insert or slip seat, or on the rails of the structure itself. The splints [Pg 74] split easily when tacked, the strands are bound to pull loose, and the seats break down under continued use. On such articles as waste baskets, boxes, screens and the like, tacking the panels in place is necessary and proper, for no appreciable wear or service comes to them. The weaving on seats needs to be continuous over and under the frame.
When a strand of usual length has been wrapped about the rails of the seat a second strand needs to be added to continue the wrapping. Tacking the strands to the under side of the rails, as in the case of reeds, cannot be resorted to with splints for the reasons just explained. Therefore some method of fastening strands to each other is necessary. Fig. 62 is a freehand sketch showing a good method. As indicated, a small rectangular piece is cut out of the used strand at B, one inch from the end. A chisel or chip carving knife is good for the purpose. Cut across the grain of the wood first to avoid splitting the splint. The end of the new strand A is notched as shown an inch back from the end, and is then inserted thru B and the two strands thus secured. All subsequent strands are secured in the same manner.
Another method which works well and involves less labor than the one just described is that of fastening the strands together with metal staples. Any type of small hand stapler will accomplish the result. The splints must be very pliable when the staple is inserted and clinched, for if they are not, the splints are certain to split. Clips used in Venetian ironwork are excellent for this purpose also. [Pg 75] It should be understood, for reasons very obvious, that these fastenings are made underneath the frame.
After the wrapping of the opposite rails is completed, the weaving is begun. The use of tacks here is also unnecessary and is inadvisable. Fasten a new strand by overlapping the end of the old one for several inches either on top or underneath the frame. The ends of each will be hidden under cross strands or spokes. Fig. 63 is a sketch illustrating the method of overlapping. AA shows strands running over the weavers, and BB strands running under. D is the end of the old or used strand, and C one end of the new one. C is pulled until the end is hidden under A. It is advisable to overlap the distance of a number of strands and not merely two as the sketch indicates. The sketch merely shows the method. The end of the strand which completes the weaving of the seat is secured underneath the frame by weaving for a short distance in the usual manner.
[Pg 76] Fig. 64 is merely Fig. 59 repeated as far as the weaving processes are concerned. In this instance hickory splints are used, and the rails are wrapped continuously across the top. Note the different effects produced, by comparing the two figures.
Fig. 65 shows a rather unusual weave. The effect is that of a number of diamond areas over the entire surface, one of which is marked to make the unit or design evident. This design need not begin at the center, but may begin at the edge of the frame as in regular diagonal weaving shown in Fig. 55. The strands comprising the unit are numbered for convenience. The process of weaving is as follows:
Strand 1—Under 1, over 2, under 1, over 2, and so on.
Strand 2—Over 2, under 3, over 3, under 3, and so on.
Strand 3—Over 1, under 2, over 1, under 2, and so on.
Strand 4—Under 2, over 3, under 3, over 3, and so on.
[Pg 77] Strand 5—Under 1, over 2, under 1, over 2, and so on.
Strand 6—Under 2, over 3, under 3, over 3, and so on.
Strand 7—Over 1, under 2, over 1, under 2, and so on.
Strand 8—Over 2, under 3, over 3, under 3, and so on.
Strand 9—Under 1, over 2, under 1, over 2, and so on.
Nine strands comprise the unit. One half of the unit from strand 5 is a repetition of the first half except that the order is reversed. Thus strands 4 and 6, 3 and 7, 2 and 8, and 1 and 9 are identical in weave. Repeat the unit until the seat is completed.
The design produced in Fig. 66 is obtained by skipping certain strands for rather unusual distances. This may be done in instances where the pattern is begun at the center of the area. No strand should be omitted its entire length however. Any number of designs may be worked out, limited only by the patience and ingenuity of the individual worker.
[Pg 78] A design for a seat or panel not illustrated herein, but which is particularly pleasing in its general effect, is produced by a unit of six strands repeated indefinitely. The weaving is started as in the diagonal weave and the process may be indicated as follows:
Strand 1—Over 1, under 3, over 3, under 3, and so on.
Strand 2—Over 2, under 3, over 3, under 3, and so on.
Strand 3—Over 3, under 3, over 3, under 3, and so on.
Strand 4—Under 1, over 3, under 3, over 3, and so on.
Strand 5—Under 2, over 3, under 3, over 3, and so on.
Strand 6—Under 3, over 3, under 3, over 3, and so on.
The isometric sketch of a stool, Fig. 67, shows the structure partly woven. It will be noticed that the splints or reeds run both ways underneath the frame as they do on top. As indicated [Pg 79] previously these strands underneath should be woven in some manner to assure a seat of maximum strength for the material used. The diagonal weave was arbitrarily chosen to illustrate the method of weaving the seat frame. The weaving underneath is not shown on the sketch. If the rails on any seat are run flush with the inside corners of the posts the woven strands will fill the entire space. On the other hand, if they are permitted an offset, a series of open spaces are left as shown on the first woven seat illustrated. The sketch shows the rails flush with the inner corner of the posts.
A Rustic Chair.—The type of chair which is particularly adapted to splint weaving is illustrated in Fig. 68. The construction is simple, and the necessary bending of pieces is readily done if a suitable steaming chest is available in the shop. Such a chest may be made of a 6 in. gas pipe cut the required length and threaded at both ends. Cap one end permanently. Have the cap for the other end removable, with a gasket in it to prevent the escape of steam, and a suitable handle attached for ease in removing. Set the pipe upon a standard, then make the necessary steam connections at the closed end and the drain at the other. Place the wood in the chest, screw on the cap, and turn on the steam. The length of time the wood should remain in the steam depends upon the wood and the size of the piece.
Suitable wood forms are easily made for bending stock. Their construction needs no elaboration. When the pieces are removed from the chest, clamp them over the forms immediately, and allow [Pg 80] them to remain clamped in this manner for several days in a dry, warm room. If steam coils or hot air registers are handy the forms may be placed over or near them to expedite the drying.
Rock elm is a good material from which to construct such a chair. The wood may be procured in the round, of different diameters. The tenons on the straight pieces may be made on the wood lathe; on the curved ones with spokeshave or draw knife. The short thin pieces on the sides should be fully housed. On a chair of this description it is good policy to assemble the sides first. Finish both the frame and the splints with a good paint composed of white lead and oil.
Another excellent material for chairs of similar design and purpose is hickory. It is the best material for the construction of furniture for lawns and porches where weathering is constant, and it is peculiarly adapted to splint and inner bark weaving. If a person lives in the right locality he may gather young second growth hickory saplings in the fall. An instructor could very readily take his classes out on such a wood-gathering expedition. The educational gain in gathering raw materials to be fashioned into finished articles of use and beauty will justify all efforts. In the fall the bark of the saplings will adhere firmly to the wood. Trim and assort the different pieces in accordance with plans, cut them into approximate lengths, and steam and bend those desired. Sand each piece smooth, and proceed to construct the chair according to previous plans. Glue and nail all important joints to prevent any possibility of separation under any weather condition. No finish of any description is necessary or desired on hickory furniture. Weathering will naturally darken both frame and splints, but will not detract in any way from the rugged, pleasing appearance of the article.
Sassafras is a very desirable wood for rustic furniture, and well adapted to splint weaving. The methods of gathering and finishing are identical to hickory. It is much lighter in weight than hickory, but is quite as serviceable. No finishing agent is necessary, altho the worker may oil or varnish it at his discretion.
[Pg 81] A Woven Table.—The table illustrated in Fig. 69 is a commercial product, evidenced by the machine turned posts and crosspieces. In school shops the posts may be made of rock elm rounds previously mentioned, or square tapered, and the rails of rounds or squares. The posts mortise in a frame underneath the top. The framework of the top is made of ⅜ in. dowel rods housed in a 6 in. round piece of ¾ in. wood, and radiating from it equal distances apart. The number of spokes needs to be odd, and cut to even lengths. The weaving is done with about a No. 6 reed, running over one, under two, over one, under two, and so on. The odd spoke permits the weaver to run continuously without skipping a spoke. A new strand is begun underneath the spoke where the last strand ends. When the top has been woven to the ends of the spokes a strip of braided No. 2 reed is nailed to each spoke with a round head, galvanized nail. The braid is made in the usual manner, as in basketry, with three series of strands of four each. When the shelf has been constructed in the same manner as the top, and both top and shelf have been fastened in their respective places, the table may be stained with naptha by pouring the stain over it. This method has been described in Chapter VI. Commercially, such articles are sized before staining. However, staining direct is the proper procedure in school shops. Use no shellac if the table is to be used on the porch or in the open where exposed to the weather.
Willows.—Willows are imported normally from Germany, Holland, Belgium and France. Because of their scarcity and demand for them, willow growing is fast becoming a thriving industry in the United States. Many experimental farms are under the direct supervision of the federal government. These have demonstrated that willows can be grown to advantage in many localities in this country. In many instances manufacturers have abandoned rattan in favor of willows for certain articles of furniture where rattan was formerly used exclusively. Willow [Pg 82] possesses all the attributes necessary for such furniture, being light in weight, durable, and strong; and it takes a good finish.
Willow stems or rods are cut when several feet long. They are then soaked in water and the outer bark peeled. The rods are then sorted, bundled and shipped to the dealer or user. The peeling is generally accomplished by hand with a peculiarly forked stick or rod. Commercially there are what are termed dry peeled rods and steam peeled rods, with the former in favor for furniture of the better class. They sell for from 6 cents to 15 cents per pound, depending on quality, length and method of peeling. Willow stems are used extensively in basketry, and for porch and summer furniture. They could be used effectively on such a table as shown in Fig. 69, but cannot generally be utilized advantageously in school shops for seating purposes only. However, they have very definite uses on some structures, and an adequate supply should be kept on hand for use when opportunity offers.
Within the confines of this book a variety of materials has been suggested, and many demonstrated, for seat weaving of various kinds and for weaving on structures other than seats. These will ordinarily afford sufficient latitude for classes of different grade in the school shops, but the instructor or worker should not infer that those indicated include all. Experience in weaving with these materials will suggest new mediums and combinations without [Pg 83] number, and experimentation with new materials by both instructor and pupil should be encouraged.
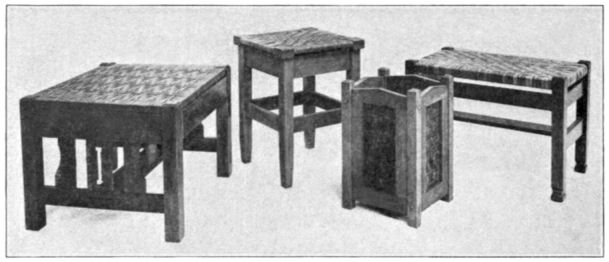
SUGGESTIVE PROJECTS.
The following firms and individuals can furnish the various weaving materials indicated. They may undoubtedly be procured locally in the larger cities.
| Cane | |
| LUSSKY, WHITE AND COOLIDGE | Chicago, Ill. |
| AMERICAN REED AND RATTAN MFG. CO. | Brooklyn, N. Y. |
| HOOVER BROS. | Kansas City, Mo. |
| L. S. DRAKE, INC. | West Newton, Mass. |
| Cane Webbing | |
| LUSSKY, WHITE AND COOLIDGE | Chicago, Ill. |
| RESTMOER MFG. CO. | Vancouver, B. C. |
| Fiber | |
| THE FIBER GRAND CO. | Grand Rapids, Mich. |
| J. L. HAMMET CO. | Brooklyn, N. Y. |
| Rush | |
| L. S. DRAKE, INC. | West Newton, Mass. |
| GUSTAV STICKLEY | Eastwood, N. Y. |
| Indian Splints | |
| C. N. SABA AND CO. | 84 Wellington St. West, Toronto, Ontario. |
| DAVID HARDIN | Patesville, Ky. |
| Reeds | |
| LUSSKY, WHITE AND COOLIDGE | Chicago, Ill. |
| AMERICAN REED AND RATTAN MFG. CO. | Brooklyn, N. Y. |
| J. L. HAMMET CO. | Brooklyn, N. Y. |
| Inner Hickory Bark | |
| THE OLD HICKORY CHAIR CO. | Martinsville, Ind. |
BOOKS ON THE MANUAL ARTS
DESIGN AND CONSTRUCTION IN WOOD. By Noyes. A book full of charm and distinction. It illustrates a series of well-designed and attractive projects, and gives suggestions for other similar projects, all suitable for home use, together with information regarding tools and processes for making. A pleasing volume abundantly and beautifully illustrated. $1.50.
HANDWORK IN WOOD. By Noyes. A comprehensive and scholarly treatise, covering logging, saw-milling, seasoning, and measuring, hand tools, wood fastenings, equipment and care of the shop, the common joints, types of wood structures, principles of joinery, and wood finishing. 304 illustrations—excellent pen drawings and many photographs. The best reference book for teachers of woodworking. $2.00.
WOOD AND FOREST. By Noyes. A reference book for teachers of woodworking. Treats of woods, distribution of American forests, life of the forest, enemies of the forest, destruction, conservation and uses of the forest, with a key to the common woods by Filibert Roth. Describes 67 principal species of wood, with maps of the habitat, leaf drawings, life-size photographs and microphotographs of sections. Profusely illustrated. $3.00.
CARPENTRY. By Griffith. A well-illustrated textbook for use in vocational schools, trade schools, technical schools and by apprentices to the trade, presenting the principles of house framing in a clear and fundamental way. It treats of the “every-day” practical problem of the carpenter and house-builder from the “laying of foundations” to the completion of the “interior finish.” $1.00.
WOODWORK FOR SECONDARY SCHOOLS. By Griffith. A textbook for high schools, colleges and technical schools. It contains chapters on woods, tools and processes, joinery, turning, carving, inlaying, wood finishing, pattern making, and the use of woodworking machines. It is a well-balanced and authoritative text, presupposing a knowledge of elementary tool processes. Specially adapted to secondary schools. $1.75.
CORRELATED COURSES IN WOODWORKING AND MECHANICAL DRAWING. By Griffith. Contains reliable information concerning organization of courses, subject-matter, and methods of teaching. It covers classification and arrangement of tool operations, stock bills, cost of material, records, shop conduct, the lesson, maintenance, equipment and lesson outlines for grammar and high schools. The most complete and thoro treatment of the subject of teaching woodworking ever published. $1.50.
ESSENTIALS OF WOODWORKING. By Griffith. A textbook written especially for grammar and high school students. The standard textbook on elementary woodworking. A clear and comprehensive treatment of woodworking tools, materials and processes, to supplement, but not to take the place of the instruction given by the teacher. The book may be used with any course of models. 75 cents.
WOODWORK FOR BEGINNERS. By Griffith. A textbook for students in the seventh and eighth grades. In a remarkably simple manner it presents only the fundamental facts regarding tools and tool processes which should be thoroly mastered by the grammar grade boy. It is technically correct, well illustrated and is adapted for use with any course of models. 50 cents.
PROJECTS FOR BEGINNING WOODWORK AND MECHANICAL DRAWING. By Griffith. A collection of 50 working drawings and working directions of projects which have proved of exceptional service where woodworking and mechanical drawing are taught in a thoro, systematic manner in the seventh and eighth grades. 75 cents.
FURNITURE MAKING—ADVANCED PROJECTS IN WOODWORK. By Griffith. A collection of problems in furniture making selected and designed with reference to high school use. On the plate with each working drawing is a good perspective sketch of the completed object. In draftsmanship and refinement of design, these problems are of superior quality. An excellent collection. 75 cents.
FURNITURE DESIGN FOR SCHOOLS AND SHOPS. By Crawshaw. A manual in furniture design containing a collection of plates showing perspective drawings of typical designs, representing particular types of furniture. Each perspective is accompanied by suggestions for rearrangements and the modeling of parts. The text discusses and illustrates principles of design as applied to furniture. Should be in the hands of every teacher of cabinet making and design. $1.00.
PROBLEMS IN FARM WOODWORK. By Blackburn. A book of working drawings of 100 practical problems relating to agriculture and farm life. Each problem is accompanied by text treating of “Purpose,” “Material,” “Bill of Stock,” “Tools,” “Directions,” and “Assembly.” Of special value to the pupil and teacher of agriculture and manual arts in rural schools, and to the boy on the farm. $1.00.
PROBLEMS IN FURNITURE MAKING. By Crawshaw. Contains 43 full-page working drawings of articles of furniture. In addition to the working drawings, there is a perspective sketch of each article completed. There are 36 pages of text giving notes on the construction of each project, chapters on the “Design” and “Construction” of furniture, and one on “Finishes.” The last chapter describes 15 methods of wood finishing, all adapted for use on furniture. $1.00.
PROBLEMS IN WOODWORKING. By Murray. A collection of 40 plates of working drawings of problems in bench work that have been successfully worked out by boys in grades seven to nine, inclusive. 75 cents.
PROBLEMS IN WOOD-TURNING. By Crawshaw. Contains 25 full-page plates of working drawings covering spindle, faceplate, and chuck turning. It gives the mathematical basis for the cuts used in turning. A valuable textbook for students’ use. 80 cents.
WORKSHOP NOTE-BOOK—WOODWORKING. By Greene. A note-book which furnishes a few general and extremely important directions about tools and processes, and provides space for additional notes and working drawings. It is essentially a collection of helps, ideas, hints, suggestions, questions, facts, illustrations, etc. It is full of suggestions; shows a keen insight into subject-matter and teaching methods, and is an effective teaching tool. 15 cents.
SHOP PROBLEMS. By Siepert. Portfolios of plates—working drawings of projects printed on tracing paper and adapted to be blue-printed for students’ use. The plates are taken from the Shop Notes and Problems department of the Manual Training Magazine. The problems include a wide variety of good design and adapted for shop use. Series I, II, III and IV have been published. Price per series, 35 cents.
GRAMMAR GRADE PROBLEMS IN MECHANICAL DRAWING. By Bennett. A remarkably simple and carefully graded textbook on the fundamentals of mechanical drawing for the use of students in the seventh and eighth grades. It combines an abundance of text and simple problems, accompanied by notes and directions. Its use insures the early formation of correct habits of technique and makes possible the development of a standard in grammar grade mechanical drawing parallel with woodworking. Abundantly and well illustrated. 38 cents.
PROBLEMS IN MECHANICAL DRAWING. By Bennett. A students’ textbook consisting of 80 plates of problems classified into groups according to principle, and arranged according to difficulty of solution. Each problem is given unsolved and, therefore, in proper form to hand to the pupil for solution. The best collection of problems for first-year high-school students available. 75 cents.
MANUAL TRAINING TOYS FOR THE BOYS’ WORKSHOP. By Moore. A popular boys’ book. It contains 35 pages of full-page plates of working drawings illustrating 42 projects. All the projects are overflowing with “boy” interest, and are well adapted to the upper grades of the elementary school. The text treats of tools and tool processes, and gives instructions for making each project. $1.00.
KITECRAFT AND KITE TOURNAMENTS. By Miller. Authoritative and comprehensive. The book deals with the construction and flying of all kinds of kites, and the making and using of kite accessories. Also aeroplanes, gliders, propellers, motors, etc. Abundantly illustrated and attractively bound. $1.00.
BIRD HOUSES BOYS CAN BUILD. By Siepert. A book of rare interest to boys. It is written in the boy spirit and combines the charm of nature with the allurements of continuation work in wood. It illustrates hundreds of bird houses and shows working drawings of various designs; also feeders, shelters, sparrow traps, and other bird accessories. The common house nesting birds are pictured and described with information regarding houses, foods, etc., suitable for each. A pleasing and practical book for wide-awake boys. Price, 50 cents.
LEATHER WORK. By Mickel. A manual on art leather work for students, teachers and craft workers. It gives detailed descriptions of the various processes of working, treating of flat modeling, embossing or repoussé, carved leather and cut work. It is well illustrated with photographs of finished work and working drawings of twenty useful and beautiful articles suitable for school and home work. 75 cents.
BOOKS ON THE MANUAL ARTS. A bibliography listing and describing 400 books mailed free.
Published by The Manual Arts Press Peoria, Ill.
Transcriber’s Note
Variant spelling is preserved as printed.
Minor punctuation errors have been repaired.
The following amendments have been made:
Page 41—trainig amended to training—... more than justifies its introduction in manual training shops.
Page 84—the transcriber has added the omitted chapter heading, ‘WEAVING MATERIALS: WHERE TO OBTAIN.’
Illustrations have been moved where necessary so that they are not in the middle of a paragraph. Omitted page numbers were the location of full page illustrations in the original book.
The caption to Fig. 49 notes that the reeds in the image are three-fourths of actual size. As image size within e-books can vary depending on the device display, for reference, the original image measured 7.6 in. by 4.3 in. / 193mm by 108mm approximately. Back to figure
End of the Project Gutenberg EBook of Seat Weaving, by L. Day Perry

*** END OF THIS PROJECT GUTENBERG EBOOK SEAT WEAVING ***

***** This file should be named 53288-h.htm or 53288-h.zip *****
This and all associated files of various formats will be found in:
        http://www.gutenberg.org/5/3/2/8/53288/

Produced by Chris Curnow, Sam W. and the Online Distributed
Proofreading Team at http://www.pgdp.net (This file was
produced from images generously made available by The
Internet Archive)

Updated editions will replace the previous one--the old editions will
be renamed.

Creating the works from print editions not protected by U.S. copyright
law means that no one owns a United States copyright in these works,
so the Foundation (and you!) can copy and distribute it in the United
States without permission and without paying copyright
royalties. Special rules, set forth in the General Terms of Use part
of this license, apply to copying and distributing Project
Gutenberg-tm electronic works to protect the PROJECT GUTENBERG-tm
concept and trademark. Project Gutenberg is a registered trademark,
and may not be used if you charge for the eBooks, unless you receive
specific permission. If you do not charge anything for copies of this
eBook, complying with the rules is very easy. You may use this eBook
for nearly any purpose such as creation of derivative works, reports,
performances and research. They may be modified and printed and given
away--you may do practically ANYTHING in the United States with eBooks
not protected by U.S. copyright law. Redistribution is subject to the
trademark license, especially commercial redistribution.

START: FULL LICENSE

THE FULL PROJECT GUTENBERG LICENSE
PLEASE READ THIS BEFORE YOU DISTRIBUTE OR USE THIS WORK

To protect the Project Gutenberg-tm mission of promoting the free
distribution of electronic works, by using or distributing this work
(or any other work associated in any way with the phrase "Project
Gutenberg"), you agree to comply with all the terms of the Full
Project Gutenberg-tm License available with this file or online at
www.gutenberg.org/license.

Section 1. General Terms of Use and Redistributing Project
Gutenberg-tm electronic works

1.A. By reading or using any part of this Project Gutenberg-tm
electronic work, you indicate that you have read, understand, agree to
and accept all the terms of this license and intellectual property
(trademark/copyright) agreement. If you do not agree to abide by all
the terms of this agreement, you must cease using and return or
destroy all copies of Project Gutenberg-tm electronic works in your
possession. If you paid a fee for obtaining a copy of or access to a
Project Gutenberg-tm electronic work and you do not agree to be bound
by the terms of this agreement, you may obtain a refund from the
person or entity to whom you paid the fee as set forth in paragraph
1.E.8.

1.B. "Project Gutenberg" is a registered trademark. It may only be
used on or associated in any way with an electronic work by people who
agree to be bound by the terms of this agreement. There are a few
things that you can do with most Project Gutenberg-tm electronic works
even without complying with the full terms of this agreement. See
paragraph 1.C below. There are a lot of things you can do with Project
Gutenberg-tm electronic works if you follow the terms of this
agreement and help preserve free future access to Project Gutenberg-tm
electronic works. See paragraph 1.E below.

1.C. The Project Gutenberg Literary Archive Foundation ("the
Foundation" or PGLAF), owns a compilation copyright in the collection
of Project Gutenberg-tm electronic works. Nearly all the individual
works in the collection are in the public domain in the United
States. If an individual work is unprotected by copyright law in the
United States and you are located in the United States, we do not
claim a right to prevent you from copying, distributing, performing,
displaying or creating derivative works based on the work as long as
all references to Project Gutenberg are removed. Of course, we hope
that you will support the Project Gutenberg-tm mission of promoting
free access to electronic works by freely sharing Project Gutenberg-tm
works in compliance with the terms of this agreement for keeping the
Project Gutenberg-tm name associated with the work. You can easily
comply with the terms of this agreement by keeping this work in the
same format with its attached full Project Gutenberg-tm License when
you share it without charge with others.

1.D. The copyright laws of the place where you are located also govern
what you can do with this work. Copyright laws in most countries are
in a constant state of change. If you are outside the United States,
check the laws of your country in addition to the terms of this
agreement before downloading, copying, displaying, performing,
distributing or creating derivative works based on this work or any
other Project Gutenberg-tm work. The Foundation makes no
representations concerning the copyright status of any work in any
country outside the United States.

1.E. Unless you have removed all references to Project Gutenberg:

1.E.1. The following sentence, with active links to, or other
immediate access to, the full Project Gutenberg-tm License must appear
prominently whenever any copy of a Project Gutenberg-tm work (any work
on which the phrase "Project Gutenberg" appears, or with which the
phrase "Project Gutenberg" is associated) is accessed, displayed,
performed, viewed, copied or distributed:

  This eBook is for the use of anyone anywhere in the United States and
  most other parts of the world at no cost and with almost no
  restrictions whatsoever. You may copy it, give it away or re-use it
  under the terms of the Project Gutenberg License included with this
  eBook or online at www.gutenberg.org. If you are not located in the
  United States, you'll have to check the laws of the country where you
  are located before using this ebook.

1.E.2. If an individual Project Gutenberg-tm electronic work is
derived from texts not protected by U.S. copyright law (does not
contain a notice indicating that it is posted with permission of the
copyright holder), the work can be copied and distributed to anyone in
the United States without paying any fees or charges. If you are
redistributing or providing access to a work with the phrase "Project
Gutenberg" associated with or appearing on the work, you must comply
either with the requirements of paragraphs 1.E.1 through 1.E.7 or
obtain permission for the use of the work and the Project Gutenberg-tm
trademark as set forth in paragraphs 1.E.8 or 1.E.9.

1.E.3. If an individual Project Gutenberg-tm electronic work is posted
with the permission of the copyright holder, your use and distribution
must comply with both paragraphs 1.E.1 through 1.E.7 and any
additional terms imposed by the copyright holder. Additional terms
will be linked to the Project Gutenberg-tm License for all works
posted with the permission of the copyright holder found at the
beginning of this work.

1.E.4. Do not unlink or detach or remove the full Project Gutenberg-tm
License terms from this work, or any files containing a part of this
work or any other work associated with Project Gutenberg-tm.

1.E.5. Do not copy, display, perform, distribute or redistribute this
electronic work, or any part of this electronic work, without
prominently displaying the sentence set forth in paragraph 1.E.1 with
active links or immediate access to the full terms of the Project
Gutenberg-tm License.

1.E.6. You may convert to and distribute this work in any binary,
compressed, marked up, nonproprietary or proprietary form, including
any word processing or hypertext form. However, if you provide access
to or distribute copies of a Project Gutenberg-tm work in a format
other than "Plain Vanilla ASCII" or other format used in the official
version posted on the official Project Gutenberg-tm web site
(www.gutenberg.org), you must, at no additional cost, fee or expense
to the user, provide a copy, a means of exporting a copy, or a means
of obtaining a copy upon request, of the work in its original "Plain
Vanilla ASCII" or other form. Any alternate format must include the
full Project Gutenberg-tm License as specified in paragraph 1.E.1.

1.E.7. Do not charge a fee for access to, viewing, displaying,
performing, copying or distributing any Project Gutenberg-tm works
unless you comply with paragraph 1.E.8 or 1.E.9.

1.E.8. You may charge a reasonable fee for copies of or providing
access to or distributing Project Gutenberg-tm electronic works
provided that

* You pay a royalty fee of 20% of the gross profits you derive from
  the use of Project Gutenberg-tm works calculated using the method
  you already use to calculate your applicable taxes. The fee is owed
  to the owner of the Project Gutenberg-tm trademark, but he has
  agreed to donate royalties under this paragraph to the Project
  Gutenberg Literary Archive Foundation. Royalty payments must be paid
  within 60 days following each date on which you prepare (or are
  legally required to prepare) your periodic tax returns. Royalty
  payments should be clearly marked as such and sent to the Project
  Gutenberg Literary Archive Foundation at the address specified in
  Section 4, "Information about donations to the Project Gutenberg
  Literary Archive Foundation."

* You provide a full refund of any money paid by a user who notifies
  you in writing (or by e-mail) within 30 days of receipt that s/he
  does not agree to the terms of the full Project Gutenberg-tm
  License. You must require such a user to return or destroy all
  copies of the works possessed in a physical medium and discontinue
  all use of and all access to other copies of Project Gutenberg-tm
  works.

* You provide, in accordance with paragraph 1.F.3, a full refund of
  any money paid for a work or a replacement copy, if a defect in the
  electronic work is discovered and reported to you within 90 days of
  receipt of the work.

* You comply with all other terms of this agreement for free
  distribution of Project Gutenberg-tm works.

1.E.9. If you wish to charge a fee or distribute a Project
Gutenberg-tm electronic work or group of works on different terms than
are set forth in this agreement, you must obtain permission in writing
from both the Project Gutenberg Literary Archive Foundation and The
Project Gutenberg Trademark LLC, the owner of the Project Gutenberg-tm
trademark. Contact the Foundation as set forth in Section 3 below.

1.F.

1.F.1. Project Gutenberg volunteers and employees expend considerable
effort to identify, do copyright research on, transcribe and proofread
works not protected by U.S. copyright law in creating the Project
Gutenberg-tm collection. Despite these efforts, Project Gutenberg-tm
electronic works, and the medium on which they may be stored, may
contain "Defects," such as, but not limited to, incomplete, inaccurate
or corrupt data, transcription errors, a copyright or other
intellectual property infringement, a defective or damaged disk or
other medium, a computer virus, or computer codes that damage or
cannot be read by your equipment.

1.F.2. LIMITED WARRANTY, DISCLAIMER OF DAMAGES - Except for the "Right
of Replacement or Refund" described in paragraph 1.F.3, the Project
Gutenberg Literary Archive Foundation, the owner of the Project
Gutenberg-tm trademark, and any other party distributing a Project
Gutenberg-tm electronic work under this agreement, disclaim all
liability to you for damages, costs and expenses, including legal
fees. YOU AGREE THAT YOU HAVE NO REMEDIES FOR NEGLIGENCE, STRICT
LIABILITY, BREACH OF WARRANTY OR BREACH OF CONTRACT EXCEPT THOSE
PROVIDED IN PARAGRAPH 1.F.3. YOU AGREE THAT THE FOUNDATION, THE
TRADEMARK OWNER, AND ANY DISTRIBUTOR UNDER THIS AGREEMENT WILL NOT BE
LIABLE TO YOU FOR ACTUAL, DIRECT, INDIRECT, CONSEQUENTIAL, PUNITIVE OR
INCIDENTAL DAMAGES EVEN IF YOU GIVE NOTICE OF THE POSSIBILITY OF SUCH
DAMAGE.

1.F.3. LIMITED RIGHT OF REPLACEMENT OR REFUND - If you discover a
defect in this electronic work within 90 days of receiving it, you can
receive a refund of the money (if any) you paid for it by sending a
written explanation to the person you received the work from. If you
received the work on a physical medium, you must return the medium
with your written explanation. The person or entity that provided you
with the defective work may elect to provide a replacement copy in
lieu of a refund. If you received the work electronically, the person
or entity providing it to you may choose to give you a second
opportunity to receive the work electronically in lieu of a refund. If
the second copy is also defective, you may demand a refund in writing
without further opportunities to fix the problem.

1.F.4. Except for the limited right of replacement or refund set forth
in paragraph 1.F.3, this work is provided to you 'AS-IS', WITH NO
OTHER WARRANTIES OF ANY KIND, EXPRESS OR IMPLIED, INCLUDING BUT NOT
LIMITED TO WARRANTIES OF MERCHANTABILITY OR FITNESS FOR ANY PURPOSE.

1.F.5. Some states do not allow disclaimers of certain implied
warranties or the exclusion or limitation of certain types of
damages. If any disclaimer or limitation set forth in this agreement
violates the law of the state applicable to this agreement, the
agreement shall be interpreted to make the maximum disclaimer or
limitation permitted by the applicable state law. The invalidity or
unenforceability of any provision of this agreement shall not void the
remaining provisions.

1.F.6. INDEMNITY - You agree to indemnify and hold the Foundation, the
trademark owner, any agent or employee of the Foundation, anyone
providing copies of Project Gutenberg-tm electronic works in
accordance with this agreement, and any volunteers associated with the
production, promotion and distribution of Project Gutenberg-tm
electronic works, harmless from all liability, costs and expenses,
including legal fees, that arise directly or indirectly from any of
the following which you do or cause to occur: (a) distribution of this
or any Project Gutenberg-tm work, (b) alteration, modification, or
additions or deletions to any Project Gutenberg-tm work, and (c) any
Defect you cause.

Section 2. Information about the Mission of Project Gutenberg-tm

Project Gutenberg-tm is synonymous with the free distribution of
electronic works in formats readable by the widest variety of
computers including obsolete, old, middle-aged and new computers. It
exists because of the efforts of hundreds of volunteers and donations
from people in all walks of life.

Volunteers and financial support to provide volunteers with the
assistance they need are critical to reaching Project Gutenberg-tm's
goals and ensuring that the Project Gutenberg-tm collection will
remain freely available for generations to come. In 2001, the Project
Gutenberg Literary Archive Foundation was created to provide a secure
and permanent future for Project Gutenberg-tm and future
generations. To learn more about the Project Gutenberg Literary
Archive Foundation and how your efforts and donations can help, see
Sections 3 and 4 and the Foundation information page at
www.gutenberg.org


Section 3. Information about the Project Gutenberg Literary Archive Foundation

The Project Gutenberg Literary Archive Foundation is a non profit
501(c)(3) educational corporation organized under the laws of the
state of Mississippi and granted tax exempt status by the Internal
Revenue Service. The Foundation's EIN or federal tax identification
number is 64-6221541. Contributions to the Project Gutenberg Literary
Archive Foundation are tax deductible to the full extent permitted by
U.S. federal laws and your state's laws.

The Foundation's principal office is in Fairbanks, Alaska, with the
mailing address: PO Box 750175, Fairbanks, AK 99775, but its
volunteers and employees are scattered throughout numerous
locations. Its business office is located at 809 North 1500 West, Salt
Lake City, UT 84116, (801) 596-1887. Email contact links and up to
date contact information can be found at the Foundation's web site and
official page at www.gutenberg.org/contact

For additional contact information:

    Dr. Gregory B. Newby
    Chief Executive and Director
    gbnewby@pglaf.org

Section 4. Information about Donations to the Project Gutenberg
Literary Archive Foundation

Project Gutenberg-tm depends upon and cannot survive without wide
spread public support and donations to carry out its mission of
increasing the number of public domain and licensed works that can be
freely distributed in machine readable form accessible by the widest
array of equipment including outdated equipment. Many small donations
($1 to $5,000) are particularly important to maintaining tax exempt
status with the IRS.

The Foundation is committed to complying with the laws regulating
charities and charitable donations in all 50 states of the United
States. Compliance requirements are not uniform and it takes a
considerable effort, much paperwork and many fees to meet and keep up
with these requirements. We do not solicit donations in locations
where we have not received written confirmation of compliance. To SEND
DONATIONS or determine the status of compliance for any particular
state visit www.gutenberg.org/donate

While we cannot and do not solicit contributions from states where we
have not met the solicitation requirements, we know of no prohibition
against accepting unsolicited donations from donors in such states who
approach us with offers to donate.

International donations are gratefully accepted, but we cannot make
any statements concerning tax treatment of donations received from
outside the United States. U.S. laws alone swamp our small staff.

Please check the Project Gutenberg Web pages for current donation
methods and addresses. Donations are accepted in a number of other
ways including checks, online payments and credit card donations. To
donate, please visit: www.gutenberg.org/donate

Section 5. General Information About Project Gutenberg-tm electronic works.

Professor Michael S. Hart was the originator of the Project
Gutenberg-tm concept of a library of electronic works that could be
freely shared with anyone. For forty years, he produced and
distributed Project Gutenberg-tm eBooks with only a loose network of
volunteer support.

Project Gutenberg-tm eBooks are often created from several printed
editions, all of which are confirmed as not protected by copyright in
the U.S. unless a copyright notice is included. Thus, we do not
necessarily keep eBooks in compliance with any particular paper
edition.

Most people start at our Web site which has the main PG search
facility: www.gutenberg.org

This Web site includes information about Project Gutenberg-tm,
including how to make donations to the Project Gutenberg Literary
Archive Foundation, how to help produce our new eBooks, and how to
subscribe to our email newsletter to hear about new eBooks.